So i started a new imaging run with higher magnification (1320mm instead of 564mm) and more sensitive camera. The resulting image of almost 13 hours data shows a lot more of the surrounding and weak features, even though, the same imaging location was used. The same Bortle 6-7 location was used, observing low above the light cone of the city.
On November 04 and 05 a few Coronal Mass Ejections were released from the sun (a coronal hole is facing our direction). Yesterday evening at 17:06 CET the solar storm arrived and created an impressive aurora display. The most fascinating fact is, that conditions were so intense, that even in southern Austria (below 47 degrees North) the sky in northern directions was colored red! It was an amazing visual experience!
The pictures below were captured with my mobile phone. The aurora was so bright, that even handheld images were possible!
As I am imaging in a rather severe light polluted location, where the landlords have installed significantly stronger light fixtures, I am plagued with strong gradients and a circular pattern in my images. These gradients won’t calibrate out with bias, flat and dark frames. I tried several approaches to get rid of them. I added a dew shield with no significant improvement. I added a light blocking hood to the back of my Newton scope with only marginal changes. I created flat frame images in different combinations (with or without dew shield, high and low exposure target, vertical or angled scope position, …). All with no significant changes.
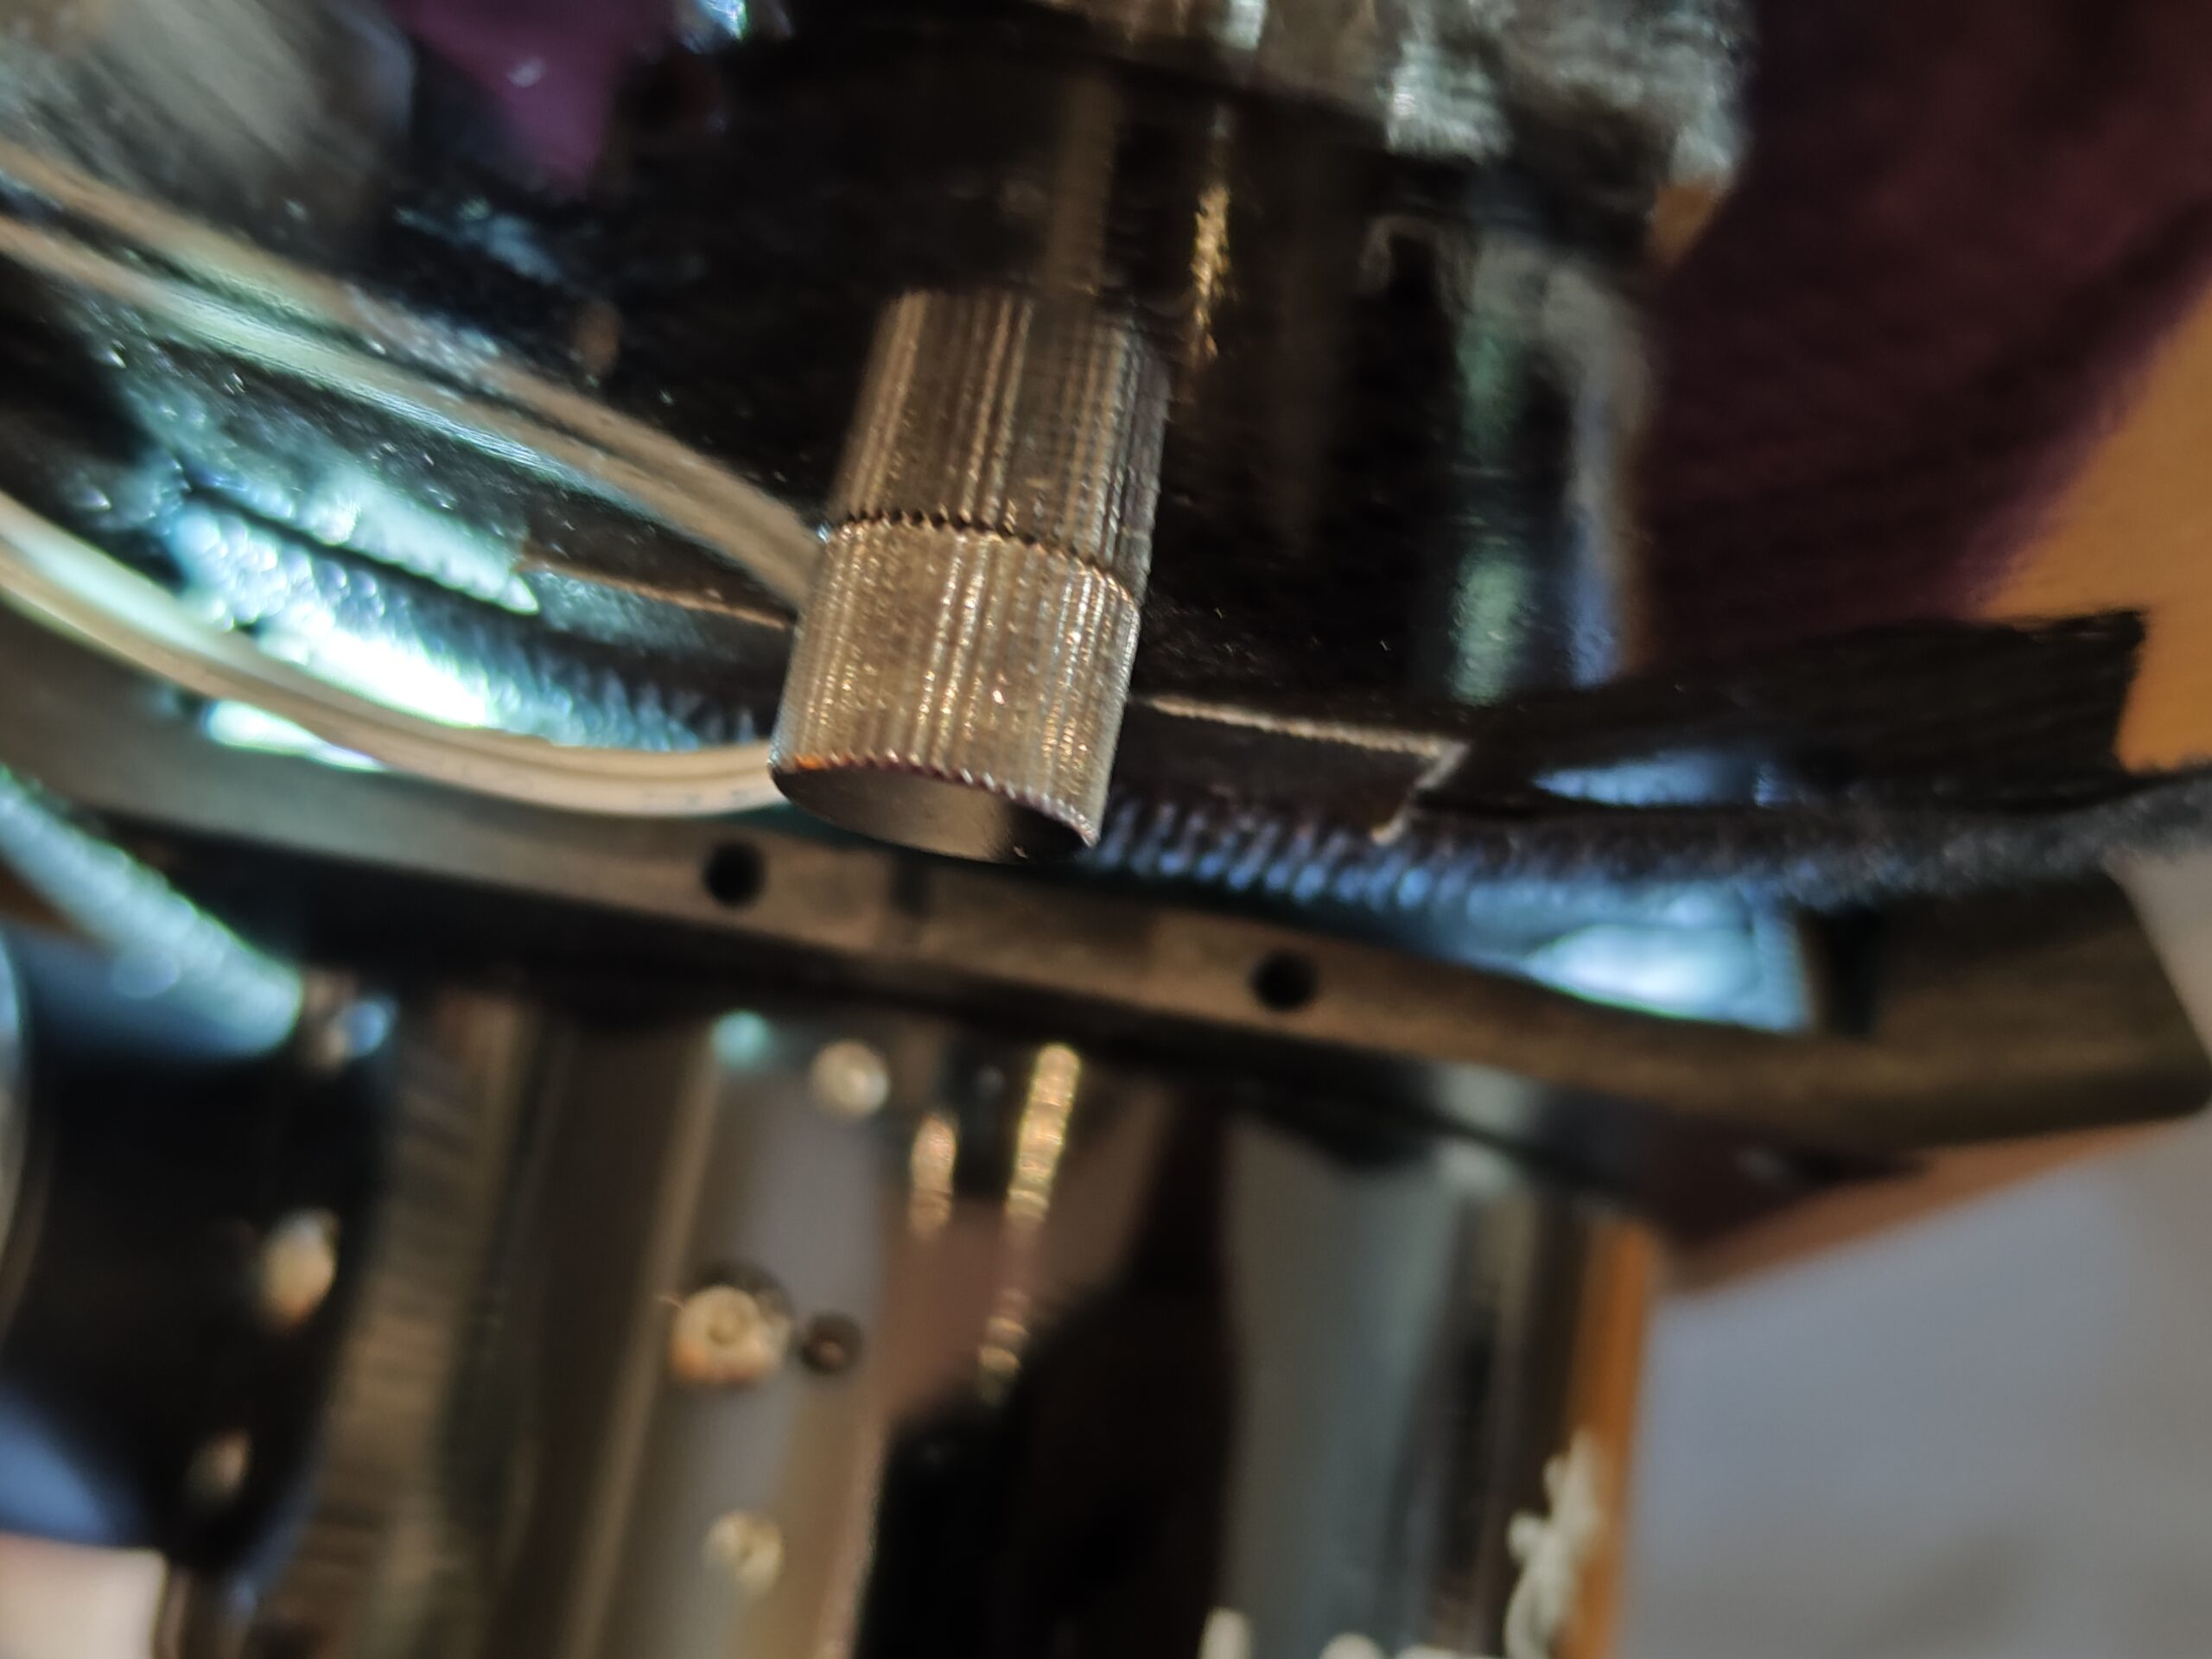
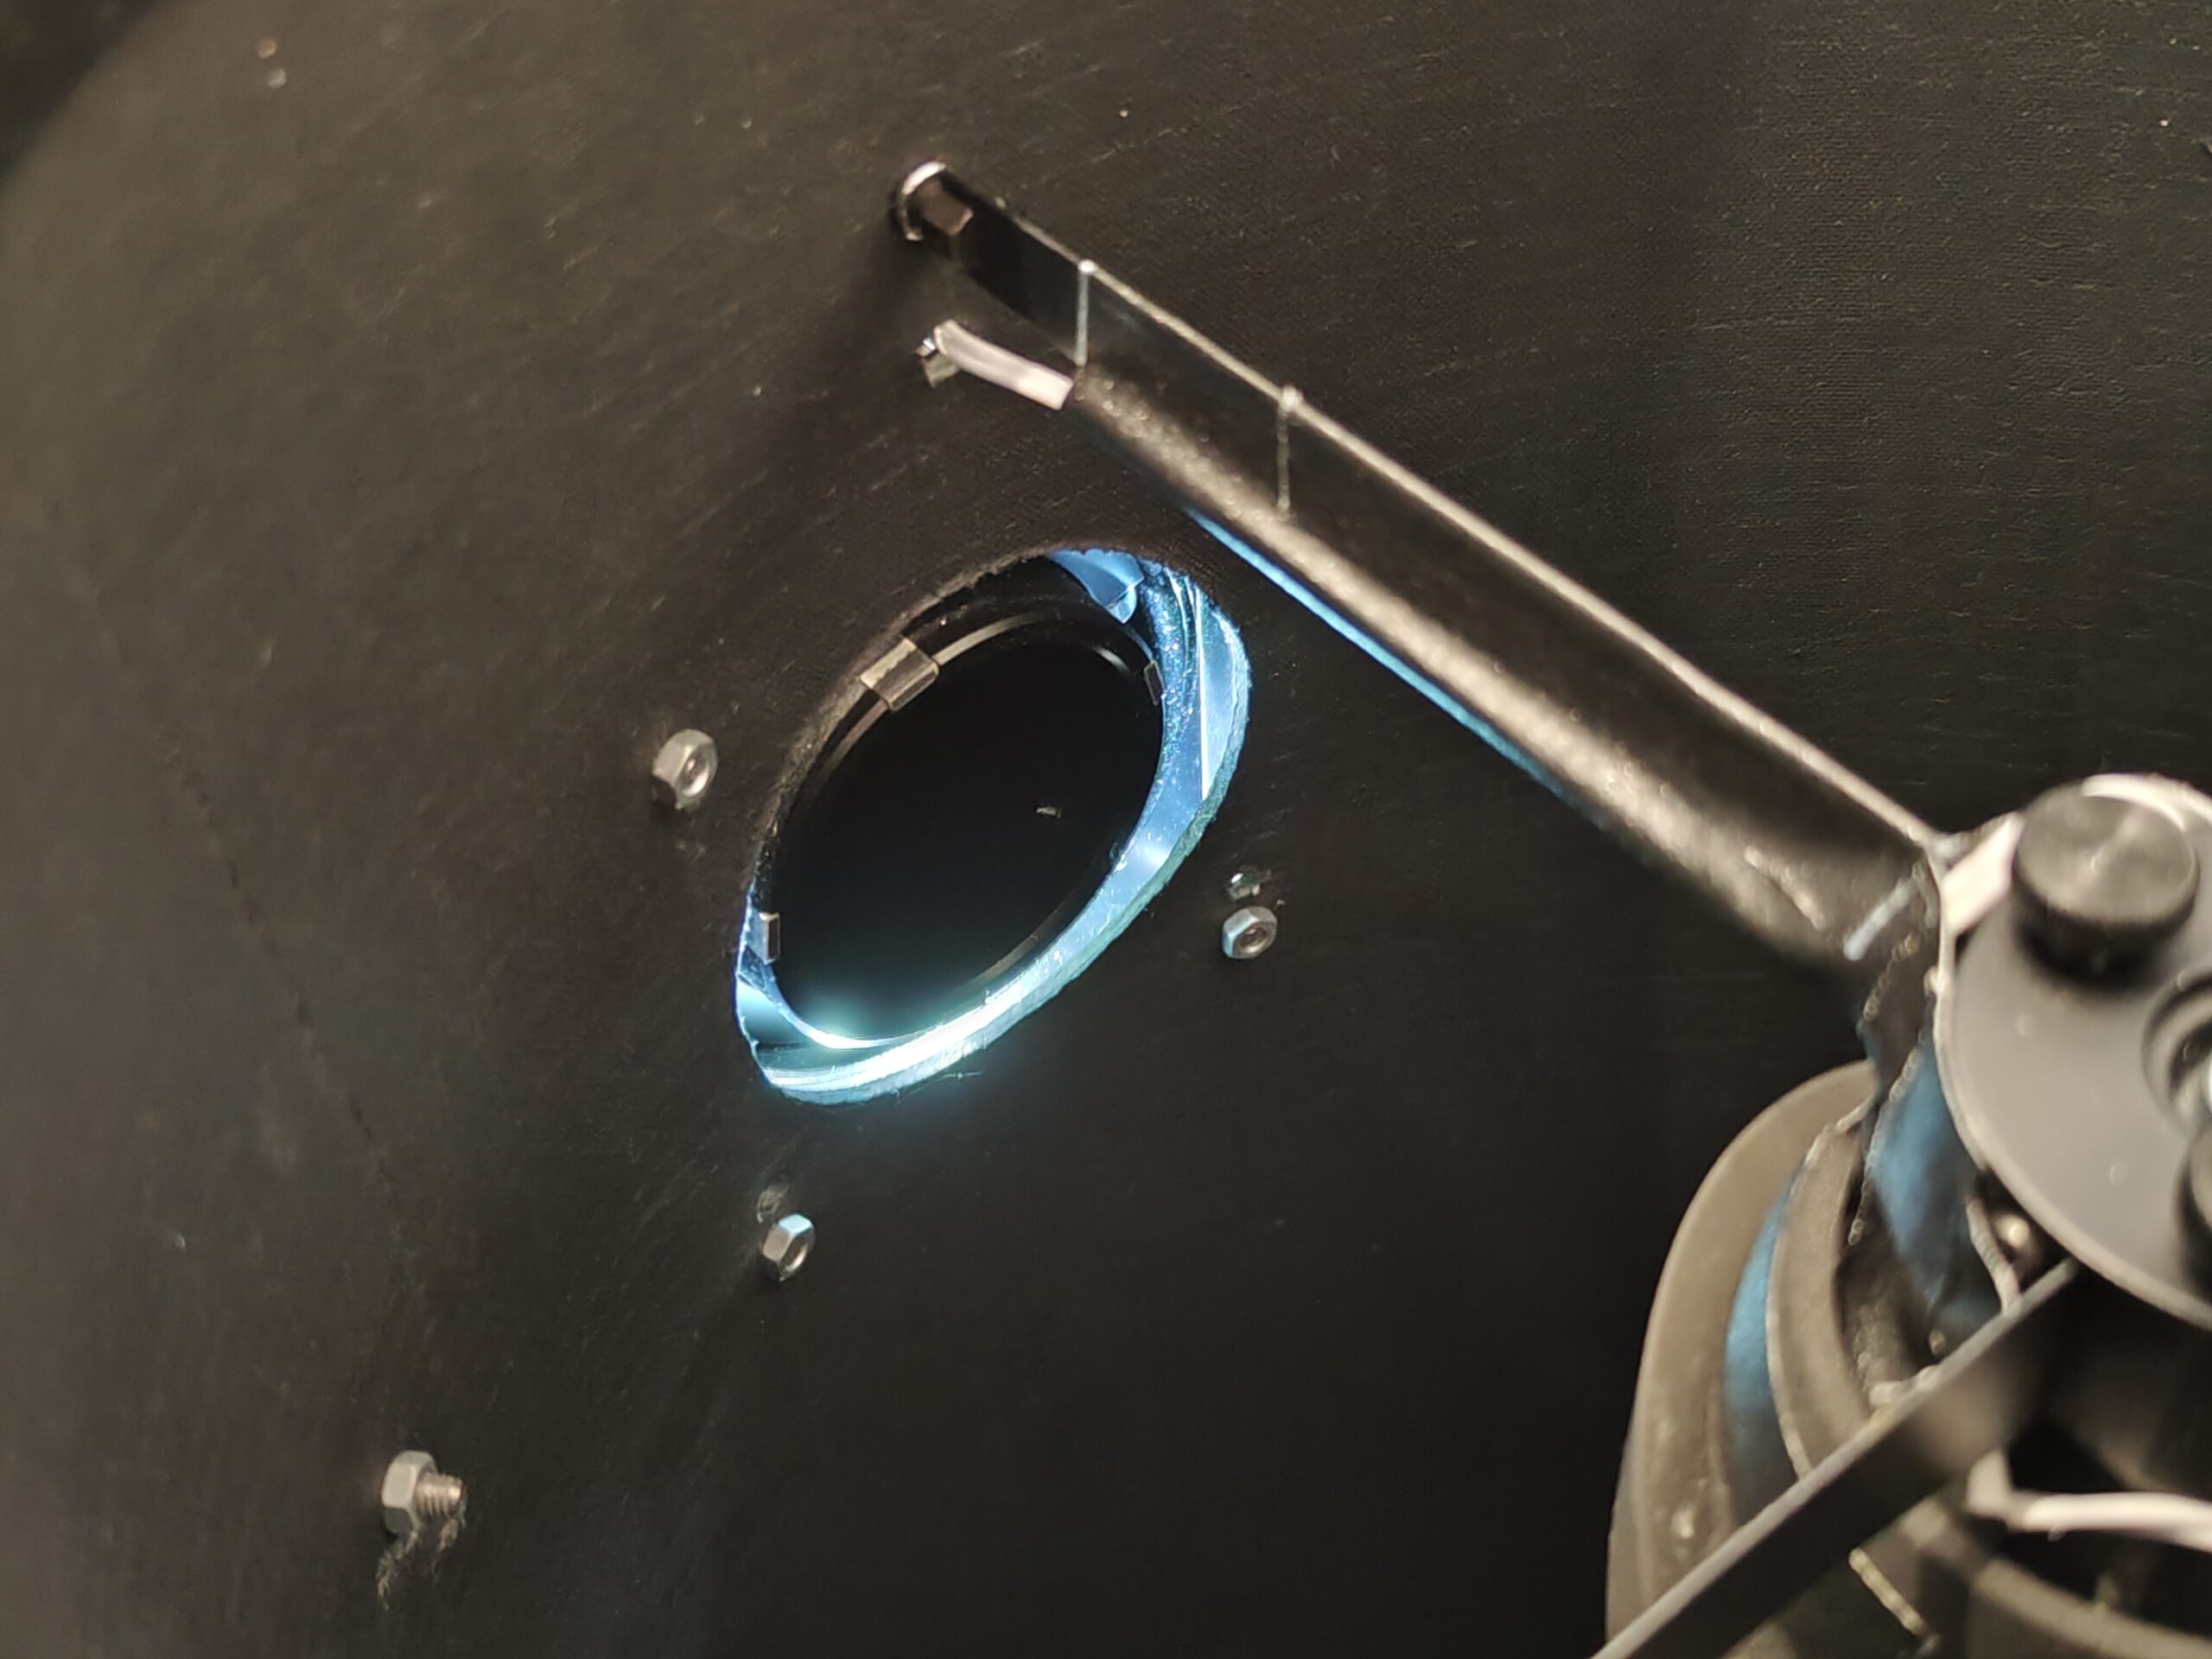
Then I located several light leaks in my imaging train. The worst leaks were at the focuser base, the Off-Axis Guider and the mounting adapter between camera and filter wheel. After closing all the gaps, the results improved. But still the gradients were clearly visible in moderately stretched images.
Focuser base has no light shieldingQuite intense light leak made visible by flash light pointed at focuser baseLight shining through at camera flangeCore of imaging train, showing Off-Axis Guider cover to block light
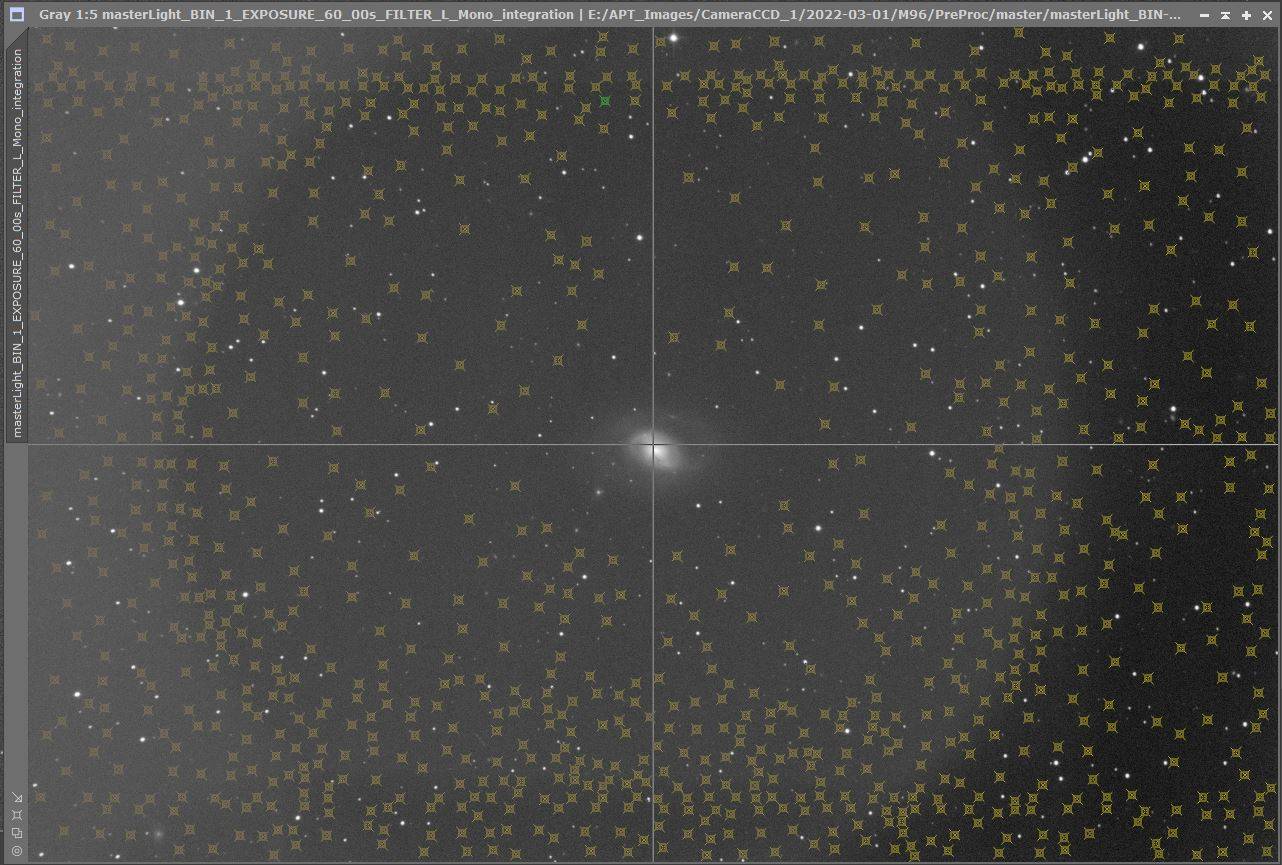
So in all the past 3 years using this setup, my only chance to create acceptable images was to reduce as much of the gradients as possible in post processing. To accomplish this I had to set several hundred calibration points for background elimination in Pixinsight (loosing any chance to process weak background nebulosity or the like). This was a tedious work, as all calibration points had to be set manually (you may not have any stars or parts of nebulosity, a galaxy within the calibration point rectangle). And still there remained some residue if the gradients. So the results were not of the quality I strived for.
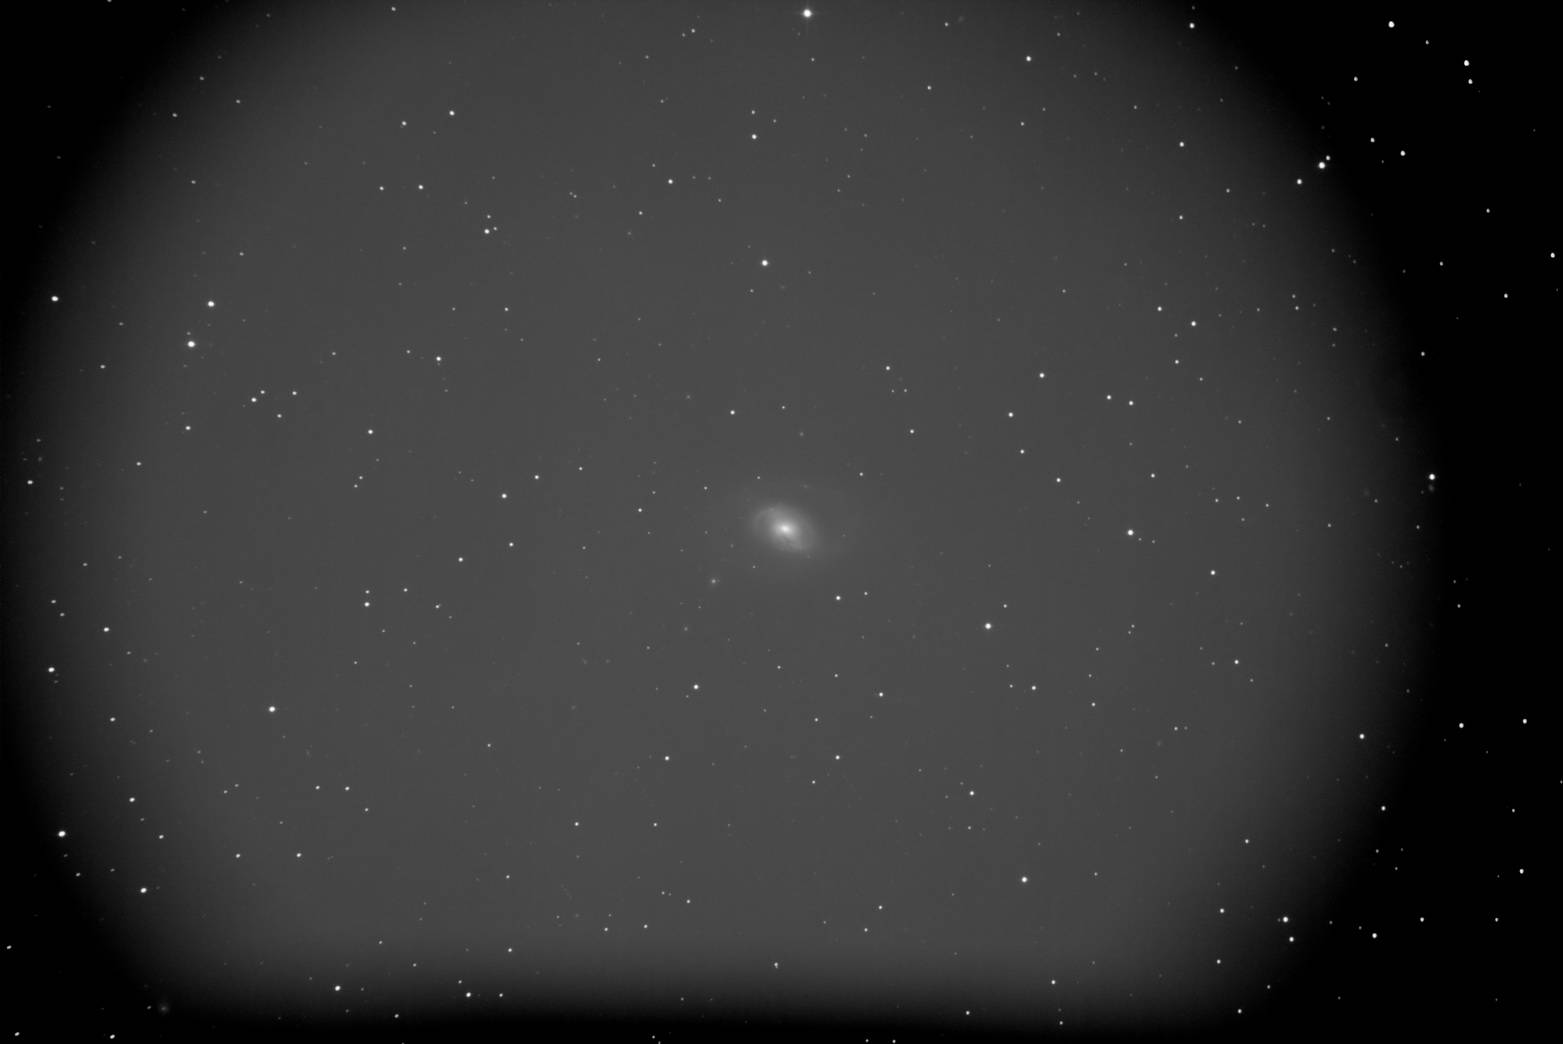
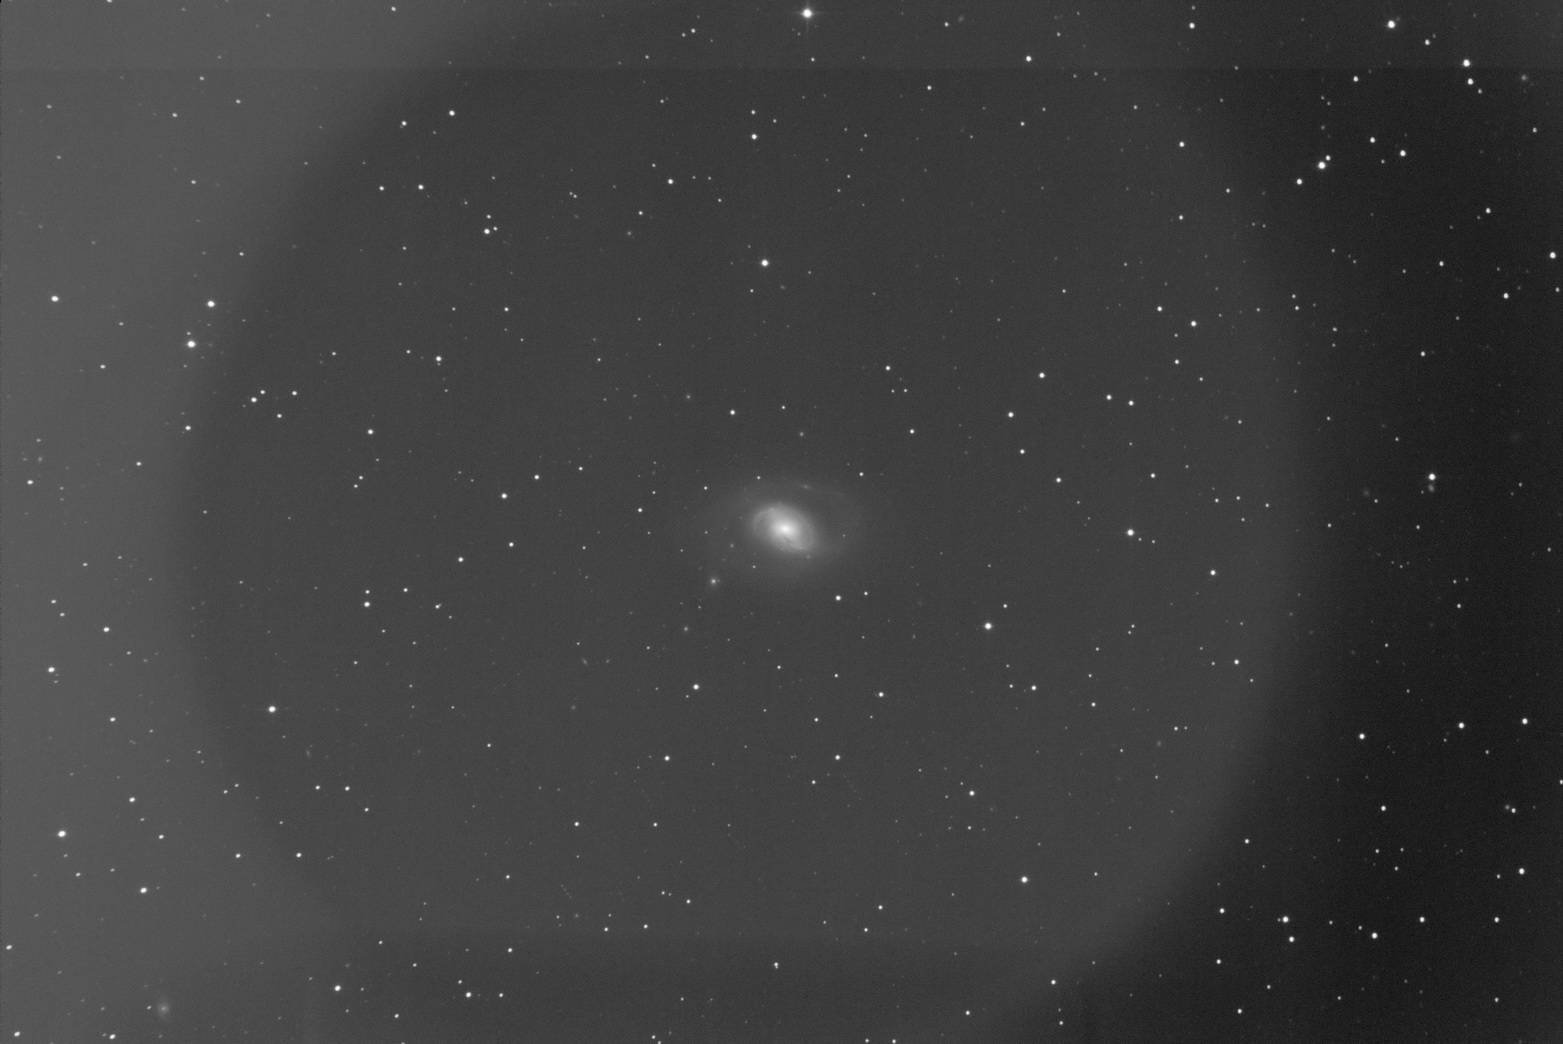
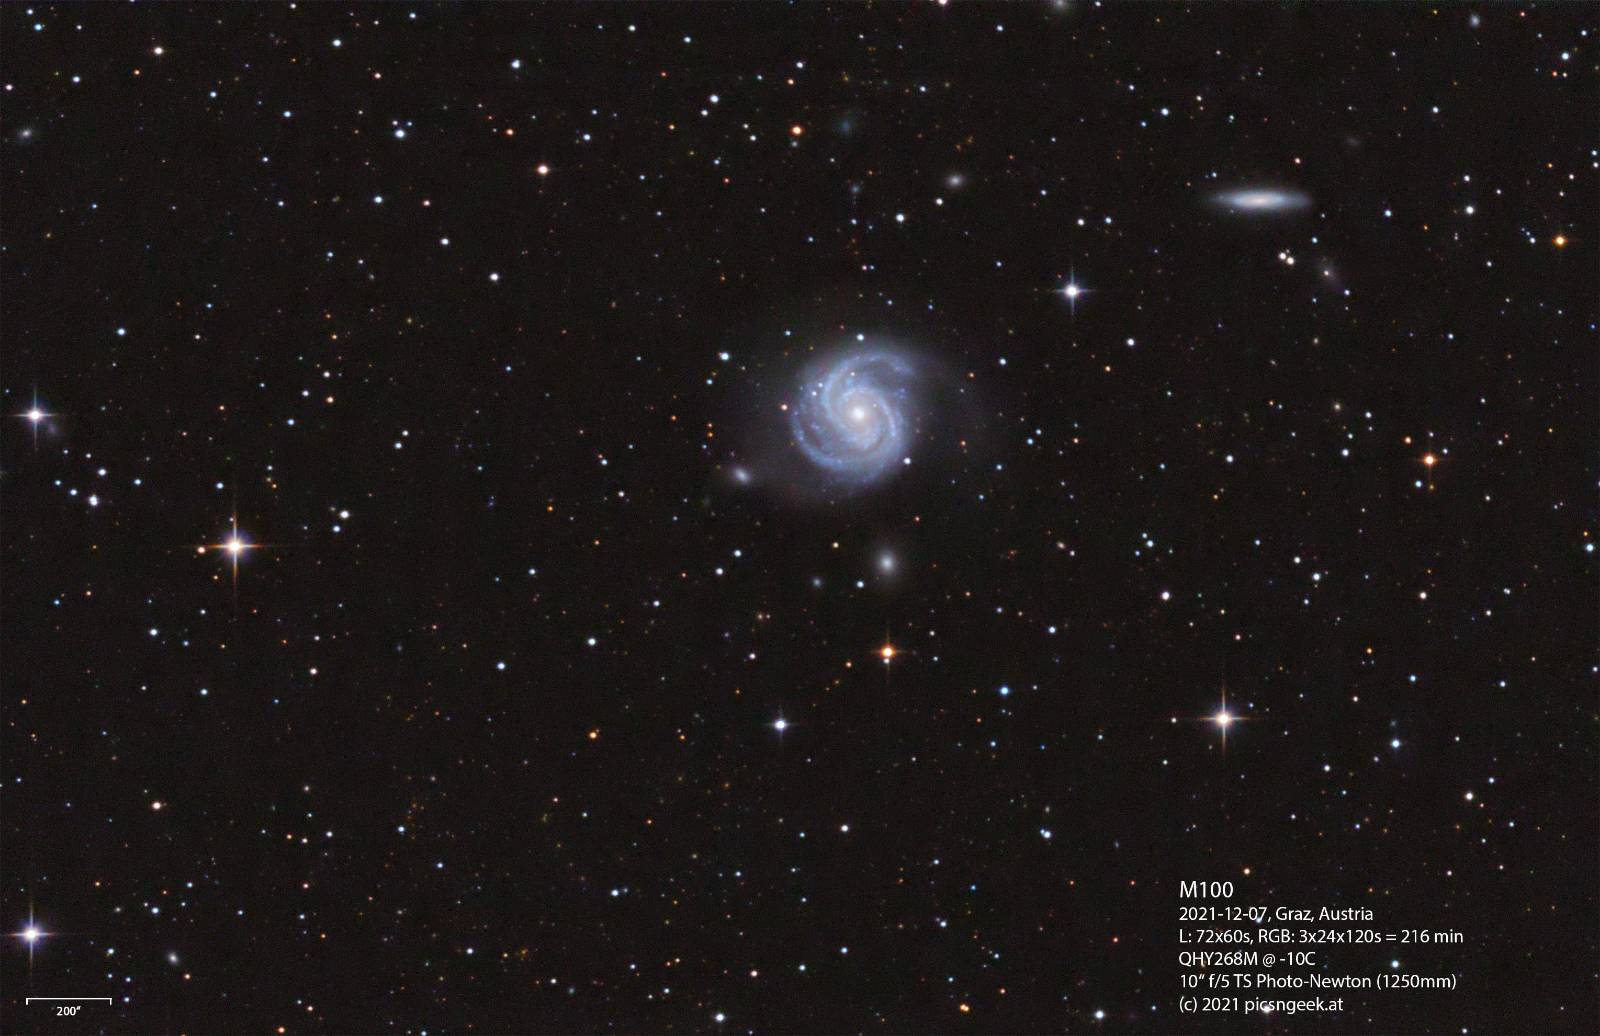
Typical raw image before calibration, stretchedImage after calibration, stretched, showing gradient and ring patternImage crowded with 800+ calibration markers for background eliminationExample of M100 after final processing (including background elimination)
Finally, I technically analyzed my scope and imaging train to check for defects like vignetting. I could not find anything, causing such a pattern. So I concluded, the only culprit possible could be the coma corrector.
History:
After several years using an economic GSO corrector, where stars have never been perfectly small and round in my setup, I switched to the Gyulai Pal designed TS-GPU corrector. Images have been really nice. But back then, I used a camera with an IMX183 sensor (15.8mm diagonal). A bit later, I switched to the IMX571 sensor, which has a significantly larger active area with a 28.3mm diagonal. Initially, I could capture images, which calibrated well. Though at this time, the street lights were far less bright and not LED based. So the filters could get rid of the stray light and light pollution. Now, with the close to 4x stronger LED street lights, everything changed.
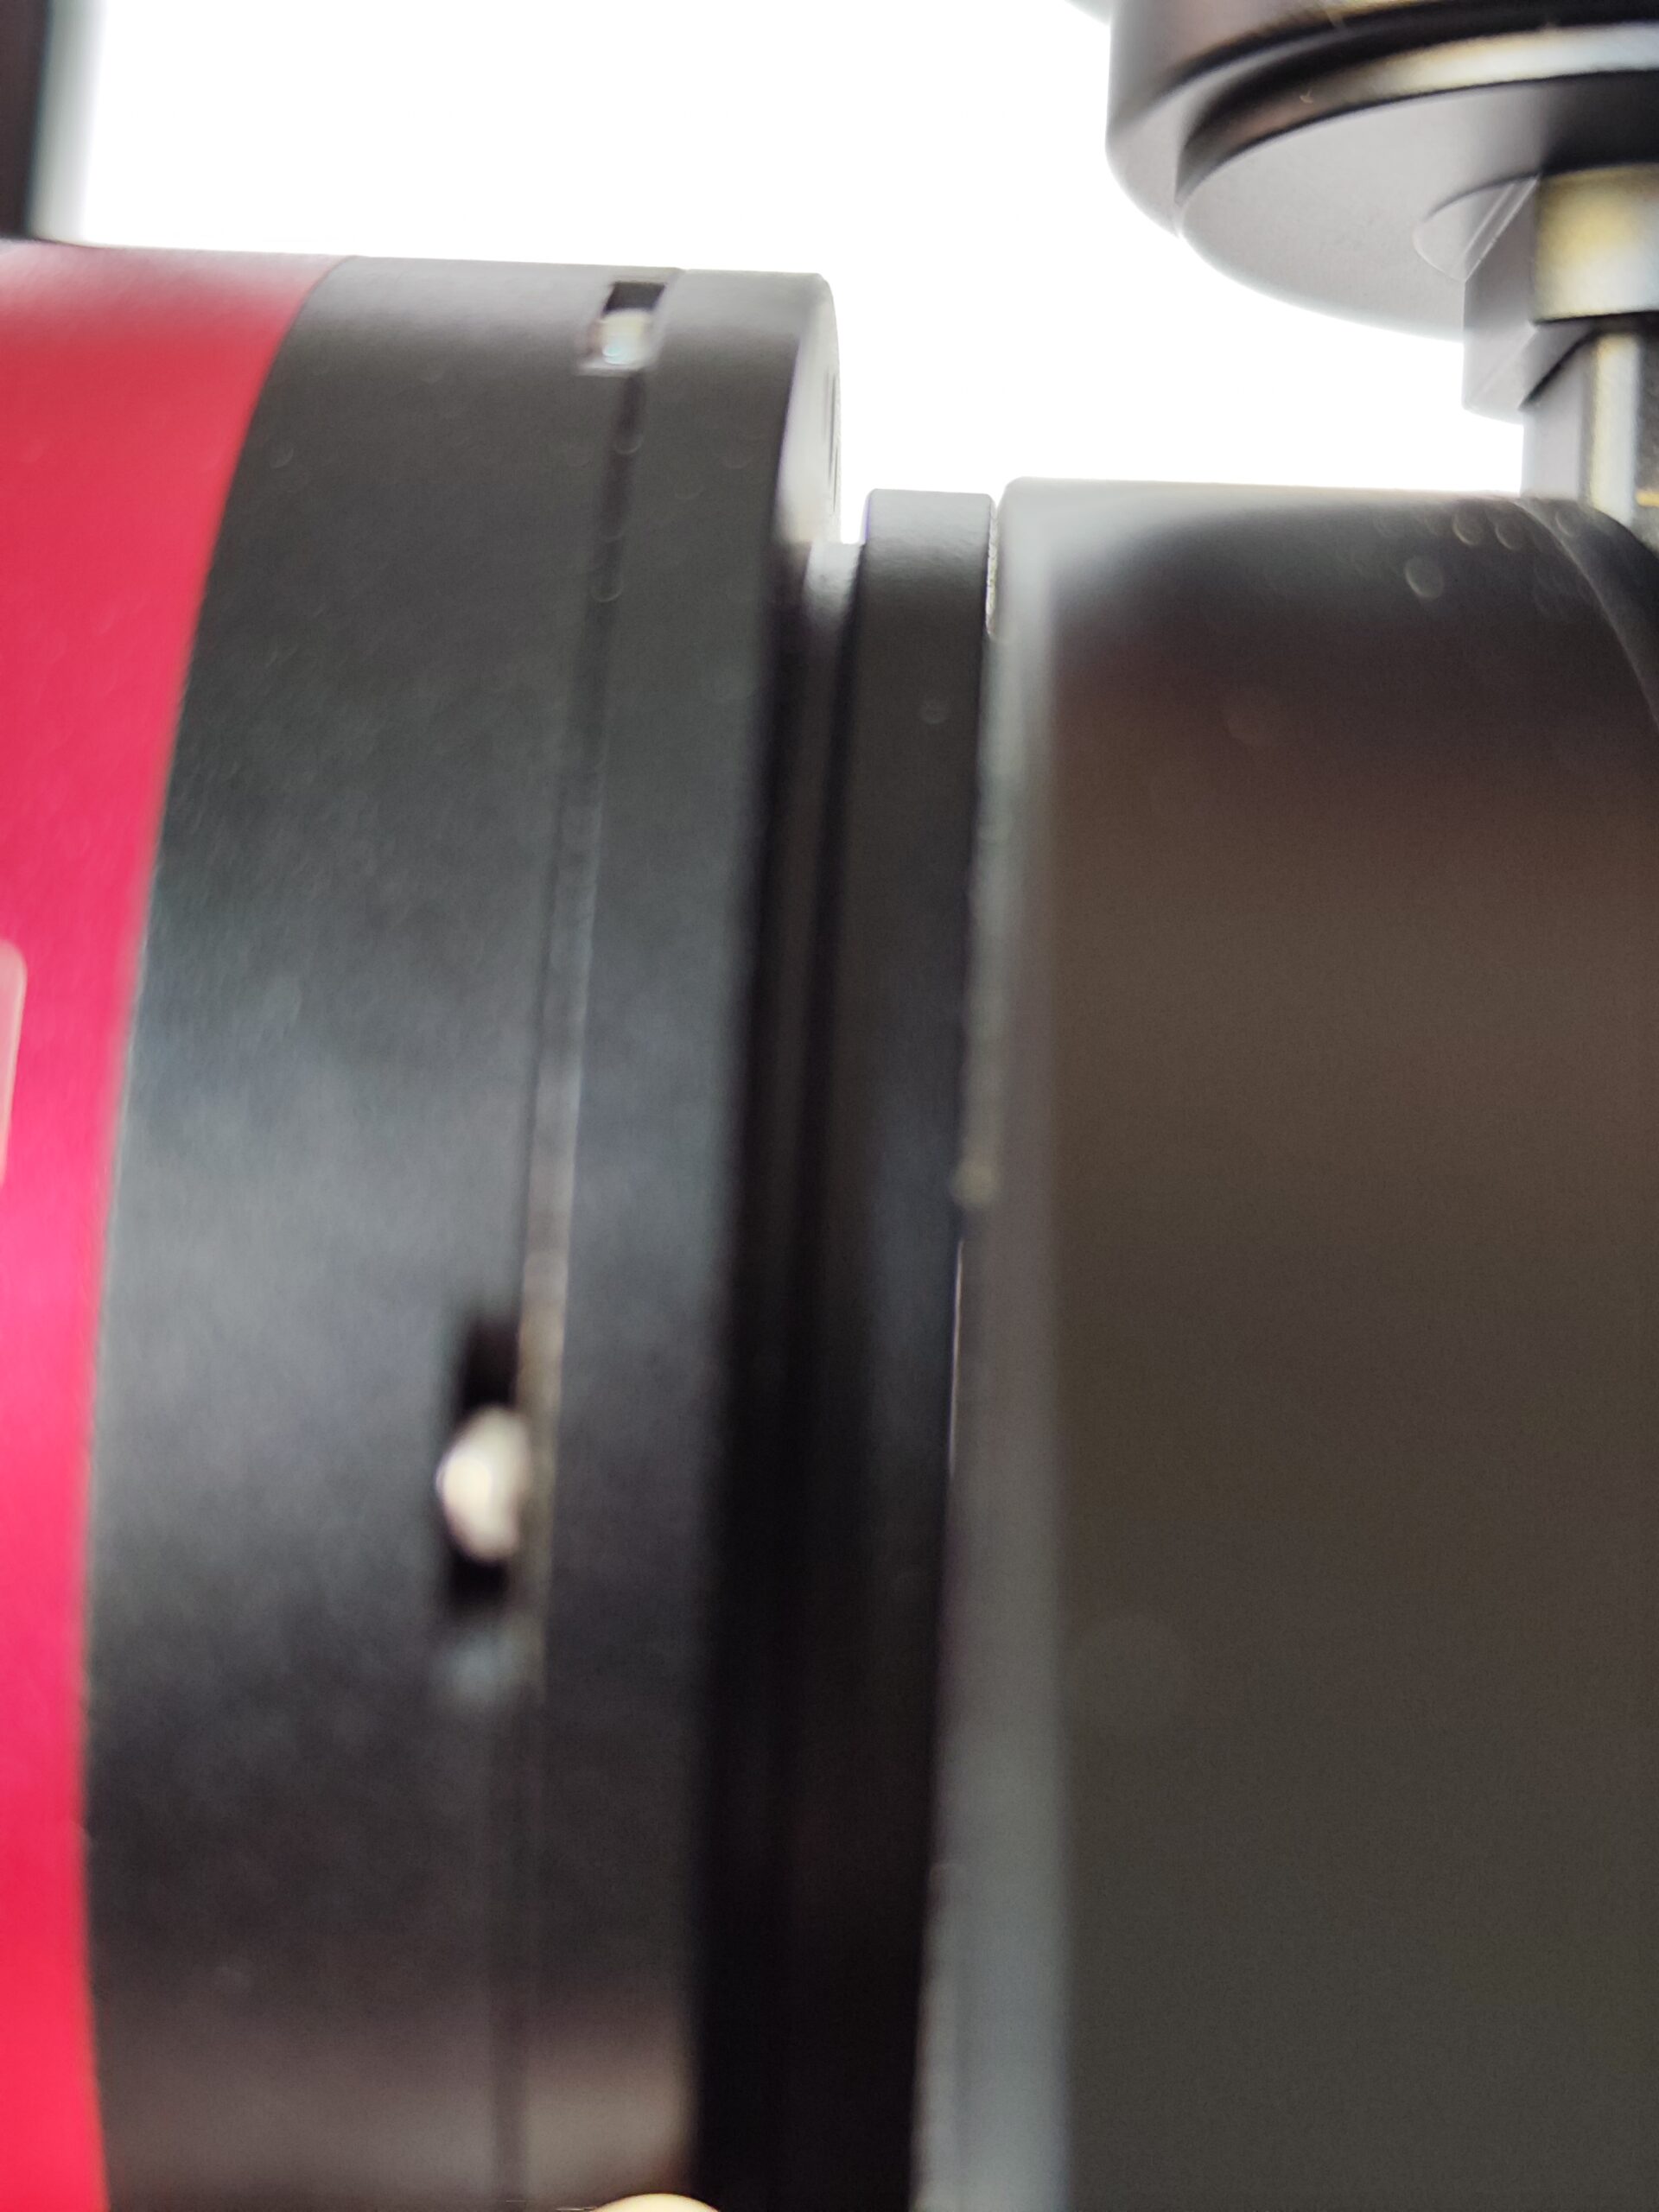
As I (hopefully) closed all the gaps where light may enter, the front of my telescope should be the only place where light should enter my imaging train. Even with a dew shield it might be possible that light may shine to the front element of the TS-GPU corrector. Either direct or by reflection of the inside wall of the dew shield (which is not the deepest and blackest black possible), the corrector may pick up some stray light. To rule this possibility out, I attached a 10mm extension tube to the front of the corrector. But unfortunately, there was no change in resulting images.
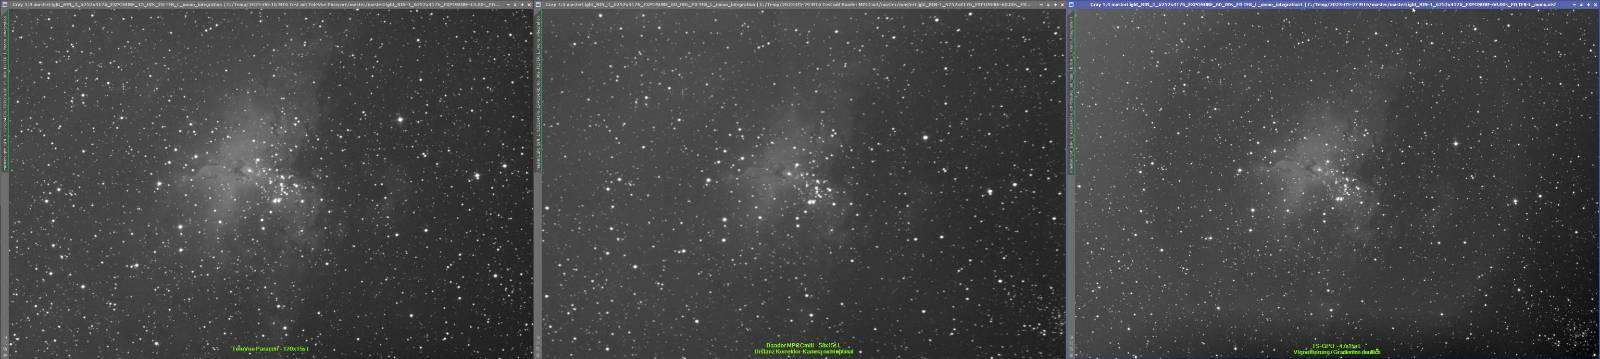
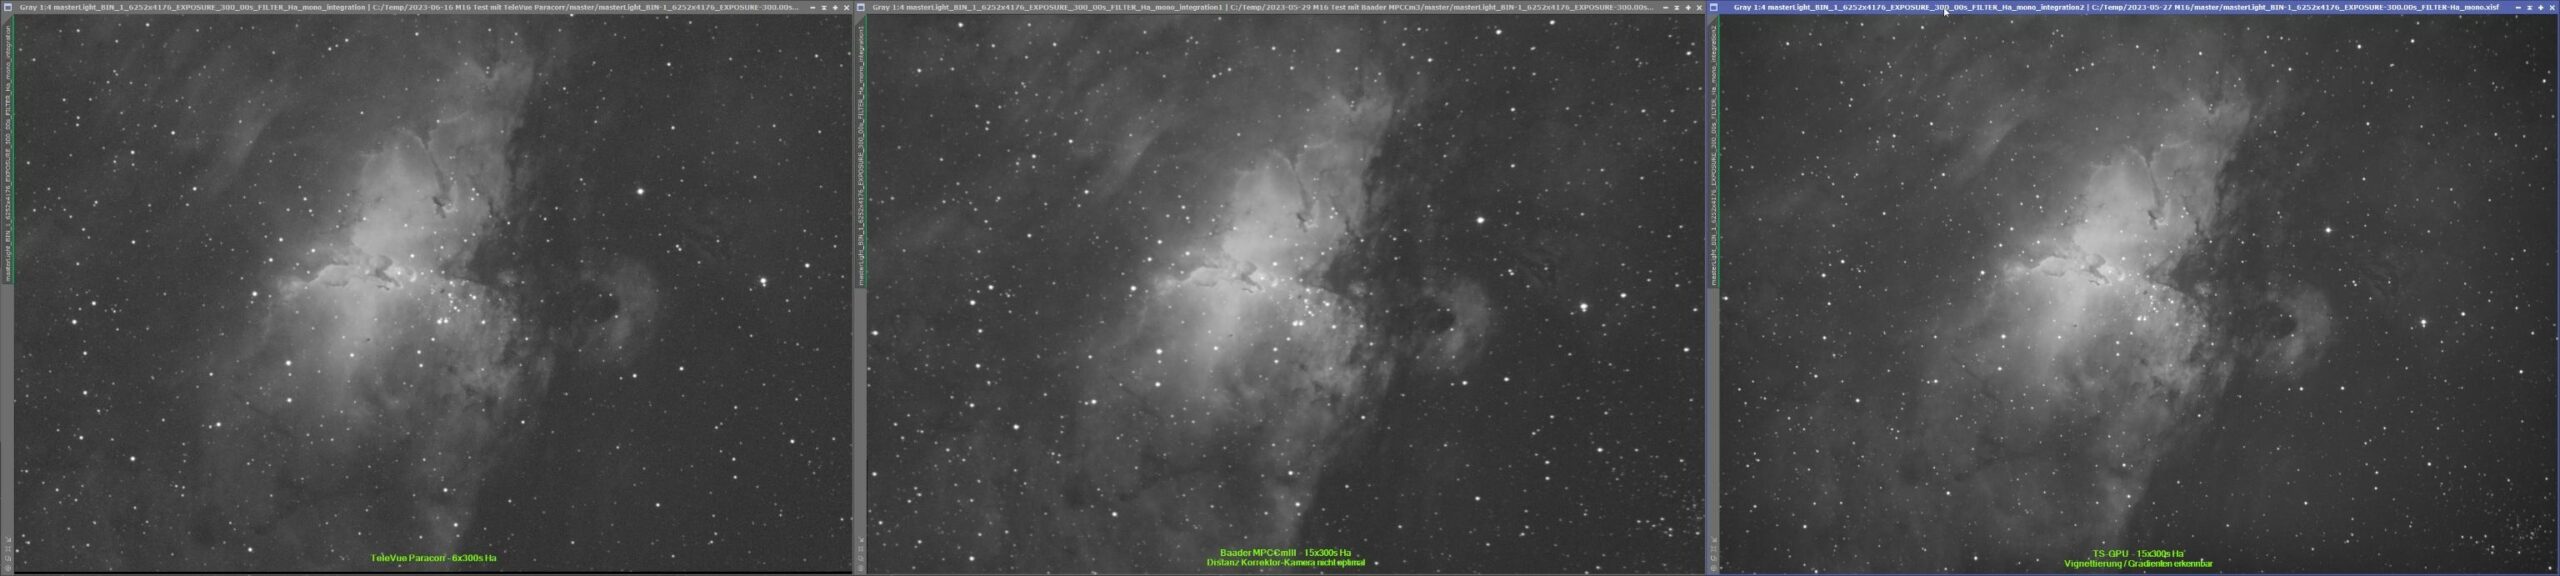
I could borrow 2 types of coma corrector from astronomy club fellows to test my assumption. So to test, I have one of each corrector: my TS-GPU, a Baader MPCC III and a TeleVue Paracorr. During the last weeks I captured M16 with all 3 coma correctors in L(RGB) and H-alpha from my home with the identical setup.
After calibration and stacking, I applied a background neutralization with only 8-10 calibration points to remove the large scale gradients from light pollution. Then I simply stretched the histogram of the images with automatic screen transfer function in Pixinsight and placed the 3 images of each filter set side by side for comparison. Well – I think, there is not much to say. Only the GPU coma corrector leads to the image defects.
Comparison of M16 in luminance with TeleVue Paracorr, Baader MPCC III and TS-GPU coma correctorsComparison of M16 in H-alpha with TeleVue Paracorr, Baader MPCC III and TS-GPU coma correctors
Observations:
the TS-GPU corrector is with 10cm quite long.
the focus position of the TS-GPU corrector lies just a few millimeters above the inner limit of my focuser
the TS-GPU corrector protrudes in the tube by 2.5cm (1 inch)
both of the other correctors (TeleVue and Baader) require the focuser at the outside limit or even beyond (using extension tubes).
the TeleVue Paracorr is 7cm long- the Baader MPCC measures less than 3cm- At focus, the Baader and TeleVue have their front lens element way inside the focuser tube. Therefore, no stray light may enter the corrector
Conclusion:
In light polluted skies, especially with nearby (street)lights, which possibly shine in the telescope, you have to be extra careful. Any stray light may cause severe trouble in astro photography. Locating the light leaks may get intensive and very time consuming. But it is well worth it to spend the time. Your efforts will pay off in post processing and final image results!If you suffer from effects comparable to mine, you should not only hunt down the obvious light leaks (using a strong flash light or even sunlight). You should also check each and every optical component, if at some point stray light may enter your optical train. Try to close gaps and holes and shield your system as good as possible!
On Sunday, May 1st, I was lucky to have the ISS transit the sun only a few kilometers away. Weather played with my plans as well. So i packed my solar scope and drove to a place right in the center of the transit line. The transit itself is a very brief event. This particular one lasted for less than 2 seconds. So everything hat to be well set up before the clock reached 08:24:22 CEST.
This image is a combination of 15 individual images captured in 1.02 seconds. The solar surface was further enhanced by a stack of 880 frames adjacent to the transit itself.
This is my first image of Messier 90. It is not yet as good as I would like it to be. Which is due to bad weather preventing further imaging. As the moon is already too bright, I will have to postpone further imaging at least to the next new-moon phase. Nevertheless, this image shows already a beautiful spiral galaxy with its companion.
Image data: Date: 2021-04-15 – 2021-04-16 Location: Graz, Austria Telescope: 10″ f/5 Newtonian with GPU corrector (1250mm focal length) Camera: QHY183M @ -20C Filters: Optolong RGB + Baader UV-IR-Cut Guiding: MGEN-II with off-axis guider Exposures: UV-IR-Cut: 45x120s, Gain 0, Offset 15 R 30x120s, G 25x120s, B 23x120s, Gain 10, Offset 15
During the last years I frequently ran into trouble with the stock Sony batteries. Neither of the camera – battery combinations I had, were capable of imaging more than approximately 4 to 5 hours (some cameras drained their batteries within less than 2 hours). So I tried to determine the optimum means of powering a Sony camera for several hours without the need to change batteries. Here is, what I came up with:
Option 1: Batteries with increased capacity Several after market companies offer compatible batteries with increased capacity. These batteries are also offered at more than competitive price tags. In my experience, most of these batteries do not provide the capacity as imprinted. There are units, which significantly exceed the stock batteries. But you may also get a battery, which is outperformed by the stock battery – even though it is offered at twice the capacity. If you are lucky and you have a well performing battery, you may extend the time in operation by 10%-50%.
Pro
Con
– economic price – up to 50% longer operation – no external units required
– does not last a whole night – capacity labelling may be misleading
Option 2: USB power supply Several – and at least the new models – have a USB port, which is capable of powering the camera during usage. This is a great way to have your camera last for hours. This is also a truly economic way, as you simply plug a USB power bank to the camera. Be aware, that you may need a special splitter cable, to simultaneously run a trigger and the USB power supply through the Multi-Port connector! See here, how such a cable may look like: Combined charger and trigger cable for Sony mirrorless cameras like A6400 But to my experience with a Sony A6400, the USB port is not capable of providing sufficient power in heavy use situations. When I had the camera shoot 3000-7000 images in 1 second intervals, I ended up with a (almost) drained battery. So the camera was constantly discharging and charging the battery. The discharge rate was higher than the charging rate. This caused the camera to significantly heat up – which is highly discouraged in astrophotography! Further more, at least the battery is set under unneccessary stress.
Pro
Con
– really cheap – may last the whole night – may be “hot plugged”
– camera may heat up – special cable may be required – battery stress
Option 3: Vertical Grip The majority of the higher end and high end cameras may be equipped with a vertical grip unit. The vertical grip units are typically fitted to the battery slot instead of the battery. To power the camera, the vertical grip incorporates a tray for 2 battereries. This doubles the capacity possible. But depending on the camera, if you keep the remote trigger port constantly in focus / pre-fire mode, the camera may not switch to the second battery. So you may end up with a camera in power-safe mode and an exhausted battery as well as a fully charged one… Further more, you have to keep in mind, that the vertical grip units are quite heavy (adding a couple 100g in weight). This may be an issue to your setup!
Pro
Con
– no external components – easy to handle
– vertical grips are not quite cheap – battery capacity only doubled – higher weight
Option 4: External power supply Some Sony cameras have a power in connector. This is a proprietary connector, which was already in use back in the Konica/Minolta aera. The connector is flat, with both poles on the opposite sides. On one side, there is a small bar, to prevent reverse plugging. So, technically, no big deal. Unfortunately the connectors are not available individually. But nowadays, you get really cheap power supplies with matching connectors online. If you are a DIY person: it is really easy to build or use such a connector; Simply provide 7.2V from a mains supply, step converter or lithium batteries ;-). To my experience, in-camera batteries are disconnected from the camera, when you plug in the external supply. So, if you plug or unplug the external supply, the camera restarts. If you leave the plug in the camera and cut the supply voltage, the camera is not operable (due to disconnected battery)
Pro
Con
– easy to handle – easy to build yourself – cheap – perfect for studio / fixed setup
– designed for mains connection – does not charge in-camera batteries – disconnects in-camera battery (no backup, if mains fails)
Option 5: Battery dummy Dummy batteries are a great sollution for long lasting scenarios. You replace the camera battery with a plastic dummy, which has a DC plug. You simply provide 7.2-8V from any means of power supply you have. This may be a mains adapter, USB power bank with step-up adapter, a 12V car socket with step-down adapter or a lithium battery pack with 2 batteries in series. There are even some dummy batteries with included USB to 7.2V converter. But they may lack the power neccessary to drive the camera (some cameras are specified with 7.2V 2A input, which is way above the typical extended USB power scheme of 5V 2.1A. As there are so many ways to provide the power needed, it is a very versatile option. But you have to be careful in selecting the right dummy. Some dummy units do not lock perfectly in the battery slot. So the dummy may fall out of the camera, or it disconnects. Some may have very stiff cables, which pose a lot of stress to the battery compartment lid (which is a true pain to replace!) Hints: – You may never want to charge the dummy battery! This may pose a high risk of damage! – provide a well stabilized, battery-like voltage for best performance – if the dummy disconnects or is not supplied, the camera is off immediately
Pro
Con
– versatile – quite cheap – may last several hours to days
– may disconnect – not every dummy is well made
Summary Depending on the situation, I choose any of these options – or even stick to replacing the batteries frequently. But my personal favorite for long lasting sessions is Option 5 in combination with a 2S 2P or 3P lithium pack (2 or 3 parallel, 2 in series). This power pack provides 7,4V straight off (no converter needed) with far more than 4 times the capacity of the stock battery. Up until now, I never ran into drained batteries, even under -10C conditions after 10 hours shooting.
This is the third and dimmest galaxy of the Leo Triplet. The other two galaxies M65 and M66 are quite close, but did not fit in the image. They seem to be not only close in our view. The three galaxies might interact in gravitational forces.
The dust band in front of the edge on view of the galaxy render it a very interesting and beautiful deep sky target.
Image data: Date: 2021-04-04 – 2021-04-08 Location: Graz, Austria Telescope: 10″ f/5 Newtonian with GPU corrector (1250mm focal length) Camera: QHY183M @ -20C Filters: Optolong RGB + Baader UV-IR-Cut Guiding: MGEN-II with off-axis guider Exposures: UV-IR-Cut: 60x120s, Gain 0, Offset 15 R, G, B: 30x120s, Gain 10, Offset 15
M104 is one of the deep sky objects, I could capture during the past week of clear nights. M104 is a rather difficult target for my balcony imaging, as it stays quite low. So the influence of the air movements cauesed by the city, I am looking over, is significantly increasing stars and reducing detail in the galaxy. Apart from detail level – this 4 hours worth of imaging goes deep enough to clearly show at least 4 small and faint galaxies around M104. The faintest being at 17.9mag.
Image data: Date: 2021-04-04 – 2021-04-08 Location: Graz, Austria Telescope: 10″ f/5 Newtonian with GPU corrector (1250mm focal length) Camera: QHY183M @ -20C Filters: Optolong RGB + Baader UV-IR-Cut Guiding: MGEN-II with off-axis guider Exposures: UV-IR-Cut: 58x120s, Gain 0, Offset 15 R, G, B: 20x120s, Gain 10, Offset 15
After several months struggle with my 10 inch Newtonian telescope, I got all configured properly. Camera, Auto-Guider, APT, etc. are well tuned to produce nice and round stars, even in several minutes long exposures. I am unable to view or image the whole sky from my balcony setup. I may only point to an area within 80 to 220 degrees azimuth (south-east to west-south-west) and an altitude from 12 degrees to at most 70 degrees. In several occasions, this is truly a very limited view, when objects are only visible for short periods. But still, my view is facing south. So over the course of one year, the majority of the well known deep sky objects are passing by. And for the rest of the sky, I will find opportunities to drive an hour to one of my mountain observing spots with Bortle 3-4 skies 🙂 Living on the northern edge of a city with a south-facing view is by far not a good combination for astronomy or astro-photography. Fortunately, the city I live in, is not too large. Therefore, my average night (if the sky is free from clouds), provides a Bortle 5-6 sky (most of the time 19.3 to 19.5 magnitues per square arc second). Visually, I have a hard time enjoying anything apart from the brightest objects. But imaging delivers really pleasing results. During the last weeks of testing and imaging, I grew the idea to create my own Messier Object images catalog, where almost all images are recorded from this one location, with all its drawbacks. By pursuing this project, I want to show, that astronomy as well as astro-photography are still possible, even though light pollution gives us a hard time…
The past months I had trouble with my 10 inch scope. I was not able to image with nice round stars. So i kept imaging with my smaller refractor, as stars were rendered round. After some investigation and chat with fellow astronomy club members, I could nail down the cause of the elongated and triangular stars: the auto-guider as well as a too short settle time after dithering were messing up. So, to achieve the round stars everyone is after, I had to increase the settle time after dithering (otherwise, I got double-images due to the offset) as well as the guiding parameters in MGEN. My settings for off-axis guiding on 1250mm focal length are: Threshold: 0.1, Aggressivness: 100% in RA and 80% in DEC and 2×2 binning.
The first test target was M48 with 50% aggressiveness. Stars were not yet fine. The second target was M65 together with M66. Stars are fine!
Image data: Date: 2021-03-31 Location: Graz, Austria Telescope: 10″ f/5 Newtonian with GPU corrector (1250mm focal length) Camera: QHY183M @ -20C Filters: Optolong RGB Guiding: MGEN-II with off-axis guider Exposures: M48: 83x10s L, 46x20s R, 30x20s G, 30x20s B M65+M66: 48x60s L, 39x60s R, 32x60s G, 20x60s B
This site uses cookies. By continuing to use the site (including navigation and scrolling), you agree to the use of cookies. more information
The cookie settings on this website are set to "allow cookies" to give you the best browsing experience possible. If you continue to use this website without changing your cookie settings or you click "Accept" below then you are consenting to this.