On August 12, two successive solar flares erupted from active region AR13395 within 92 minutes. The video begins at the end of the C8.8 eruption, which started at 09:04 UTC. At 2/3rds in the video, the second eruption occurs, which startet at 10:36 and lasted till 10:54.
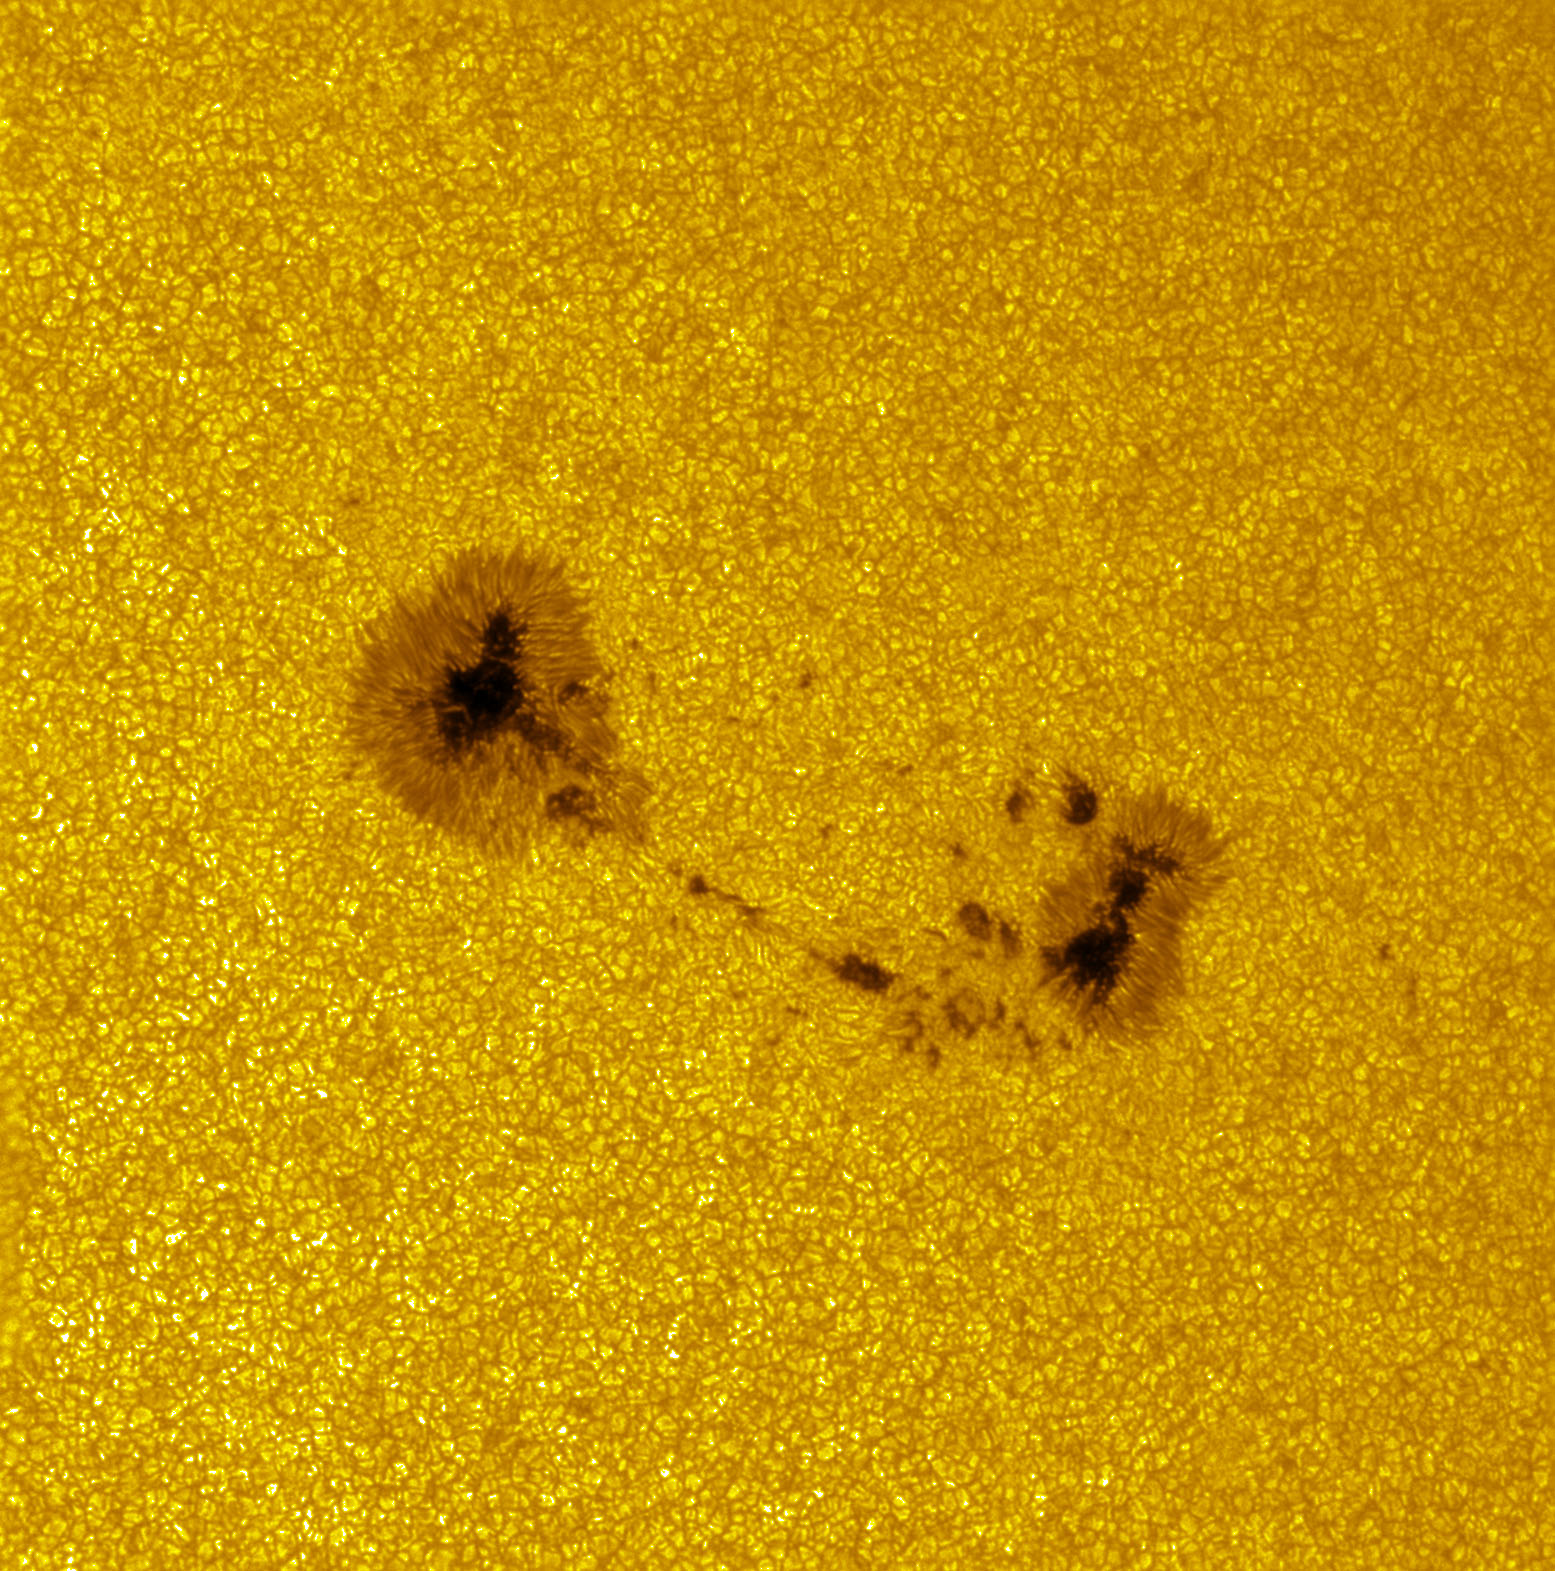
High resolution granulation around sunspot group 13403
Last week I could participate in a telescope meeting in hungary. Although it was hot and humid, the air was quite stable during the day. So I could capture a timelapse of the beautiful sunspot region 13403 with impressive resolution of 0.158 arcseconds per pixel through my 10″ Newtonian telescope. The high magnification paid off, as I could for the first time capture the fascitating motion of the granulation.
Technical details:
Telescope: 10″ f/5 Newton + 2.5x Barlow lens = 3125mm effective focal length
Camera: QHY183M (2.4µm pixels)
Filters: Baader solar film + Baader solar continuum
Sequence: 149x 1000 frames, 30s interval
Recording time: 10:26-11:42 UTC
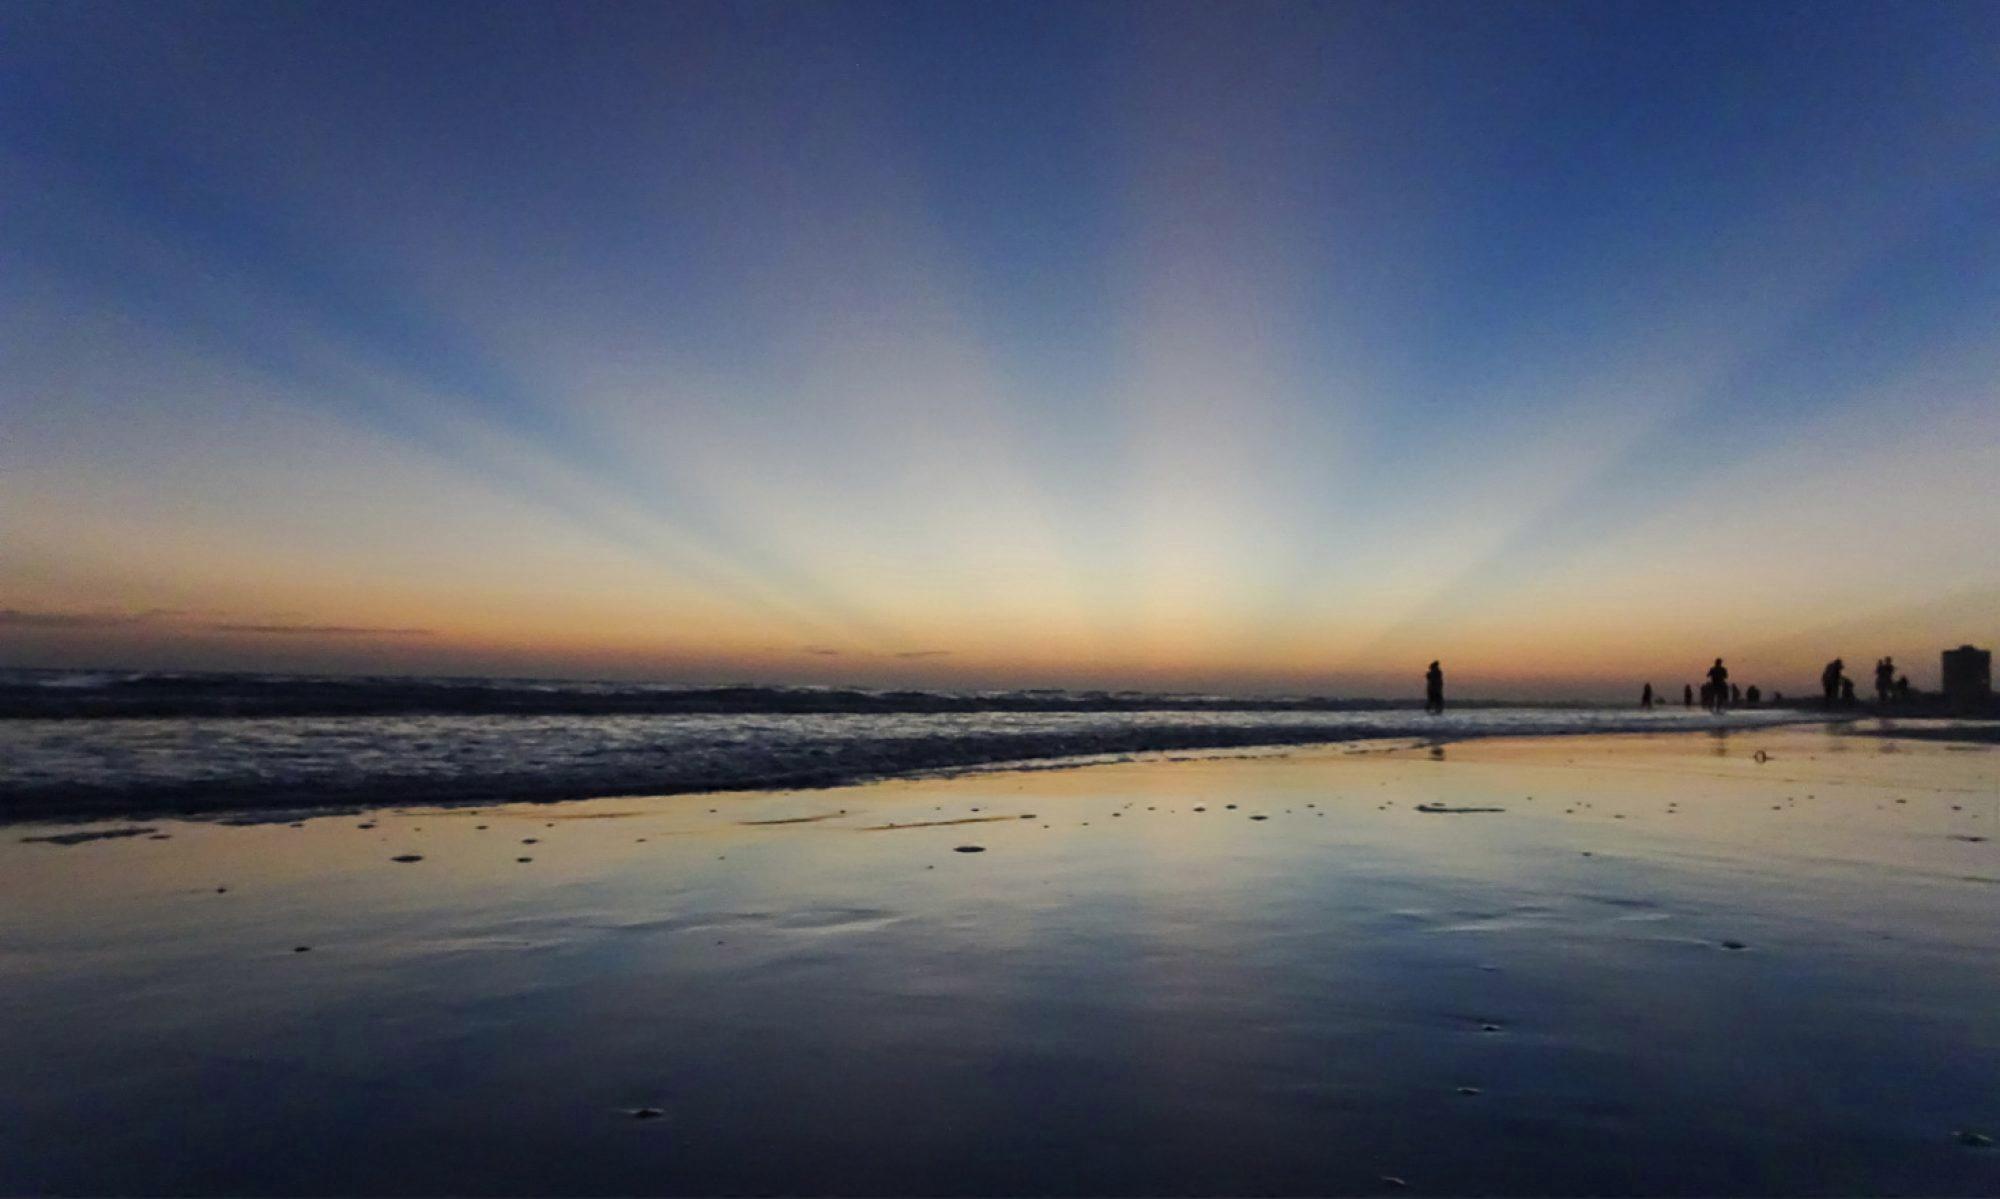
Aurora in Austria after a G4 solar storm
On Friday, April 21, a solar eruption triggered a G4 solar storm. The intensity of the solar storm lead to wide spread Aurora activity. The Aurora could be observed at least as far south as to 47° northern latitude.
I happened to be out of city, so I could capture the following shots:

Powering a Sony mirrorless camera for timelapse or astrophotography
During the last years I frequently ran into trouble with the stock Sony batteries. Neither of the camera – battery combinations I had, were capable of imaging more than approximately 4 to 5 hours (some cameras drained their batteries within less than 2 hours). So I tried to determine the optimum means of powering a Sony camera for several hours without the need to change batteries. Here is, what I came up with:
Option 1: Batteries with increased capacity
Several after market companies offer compatible batteries with increased capacity. These batteries are also offered at more than competitive price tags.
In my experience, most of these batteries do not provide the capacity as imprinted. There are units, which significantly exceed the stock batteries. But you may also get a battery, which is outperformed by the stock battery – even though it is offered at twice the capacity.
If you are lucky and you have a well performing battery, you may extend the time in operation by 10%-50%.
| Pro | Con |
| – economic price – up to 50% longer operation – no external units required | – does not last a whole night – capacity labelling may be misleading |
Option 2: USB power supply
Several – and at least the new models – have a USB port, which is capable of powering the camera during usage. This is a great way to have your camera last for hours. This is also a truly economic way, as you simply plug a USB power bank to the camera.
Be aware, that you may need a special splitter cable, to simultaneously run a trigger and the USB power supply through the Multi-Port connector! See here, how such a cable may look like: Combined charger and trigger cable for Sony mirrorless cameras like A6400
But to my experience with a Sony A6400, the USB port is not capable of providing sufficient power in heavy use situations. When I had the camera shoot 3000-7000 images in 1 second intervals, I ended up with a (almost) drained battery. So the camera was constantly discharging and charging the battery. The discharge rate was higher than the charging rate. This caused the camera to significantly heat up – which is highly discouraged in astrophotography!
Further more, at least the battery is set under unneccessary stress.
| Pro | Con |
| – really cheap – may last the whole night – may be “hot plugged” | – camera may heat up – special cable may be required – battery stress |
Option 3: Vertical Grip
The majority of the higher end and high end cameras may be equipped with a vertical grip unit. The vertical grip units are typically fitted to the battery slot instead of the battery. To power the camera, the vertical grip incorporates a tray for 2 battereries. This doubles the capacity possible. But depending on the camera, if you keep the remote trigger port constantly in focus / pre-fire mode, the camera may not switch to the second battery. So you may end up with a camera in power-safe mode and an exhausted battery as well as a fully charged one…
Further more, you have to keep in mind, that the vertical grip units are quite heavy (adding a couple 100g in weight). This may be an issue to your setup!
| Pro | Con |
| – no external components – easy to handle | – vertical grips are not quite cheap – battery capacity only doubled – higher weight |
Option 4: External power supply
Some Sony cameras have a power in connector. This is a proprietary connector, which was already in use back in the Konica/Minolta aera. The connector is flat, with both poles on the opposite sides. On one side, there is a small bar, to prevent reverse plugging. So, technically, no big deal. Unfortunately the connectors are not available individually. But nowadays, you get really cheap power supplies with matching connectors online.
If you are a DIY person: it is really easy to build or use such a connector; Simply provide 7.2V from a mains supply, step converter or lithium batteries ;-).
To my experience, in-camera batteries are disconnected from the camera, when you plug in the external supply. So, if you plug or unplug the external supply, the camera restarts. If you leave the plug in the camera and cut the supply voltage, the camera is not operable (due to disconnected battery)
| Pro | Con |
| – easy to handle – easy to build yourself – cheap – perfect for studio / fixed setup | – designed for mains connection – does not charge in-camera batteries – disconnects in-camera battery (no backup, if mains fails) |
Option 5: Battery dummy
Dummy batteries are a great sollution for long lasting scenarios. You replace the camera battery with a plastic dummy, which has a DC plug. You simply provide 7.2-8V from any means of power supply you have. This may be a mains adapter, USB power bank with step-up adapter, a 12V car socket with step-down adapter or a lithium battery pack with 2 batteries in series. There are even some dummy batteries with included USB to 7.2V converter. But they may lack the power neccessary to drive the camera (some cameras are specified with 7.2V 2A input, which is way above the typical extended USB power scheme of 5V 2.1A.
As there are so many ways to provide the power needed, it is a very versatile option. But you have to be careful in selecting the right dummy. Some dummy units do not lock perfectly in the battery slot. So the dummy may fall out of the camera, or it disconnects. Some may have very stiff cables, which pose a lot of stress to the battery compartment lid (which is a true pain to replace!)
Hints:
– You may never want to charge the dummy battery! This may pose a high risk of damage!
– provide a well stabilized, battery-like voltage for best performance
– if the dummy disconnects or is not supplied, the camera is off immediately
| Pro | Con |
| – versatile – quite cheap – may last several hours to days | – may disconnect – not every dummy is well made |
Summary
Depending on the situation, I choose any of these options – or even stick to replacing the batteries frequently. But my personal favorite for long lasting sessions is Option 5 in combination with a 2S 2P or 3P lithium pack (2 or 3 parallel, 2 in series). This power pack provides 7,4V straight off (no converter needed) with far more than 4 times the capacity of the stock battery. Up until now, I never ran into drained batteries, even under -10C conditions after 10 hours shooting.
Prominence timelapse from 2020-11-22
On November 22 on the south-eastern limb of the sun, a stable prominence was visible. The prominence seems to consist of three different prominences (one flame type, one fan type and one arch type). They all seem to origin from sunspots 12785 and 12786. Whereas I assume, that the arch type prominence to the right is most likely from 12786.
The timelapse shows the activity of the prominences from 09:45-12:30 UTC. The clip has 342 individual images. Each image was stacked from 12 frames out of bursts of 300 frames. Post processing and colorization in PixInsight.
These 2 images from beginning and end of sequence show the beautiful structur as well as the changes within.


Comet C2020 F3 NEOWISE
This years best view of a comet has finally been visible in my region. Weather conditions have been really favorable for a night time spectacle.
Combined with the setting across my home town Graz, viewing from top of Plabutsch (located at the eastern edge of Graz) permitted the comet to rise exactly next to the 2 antennas on the mountain top of Schöckl in 14km distance.
See how remarkably bright the comet is in the wider angle image below. This image was taken with a mobile phone camera! And the comet is clearly visible!
The timelapse video shows the comet rising at 02:38 CEST until mid of nautic twilight at 03:54 CEST. See the amazing pattern of the noctilucent clouds going in waves!


Moon rise over Graz
Last night, before Comet C2020/F3 NEOWISE rose above the horizon, I created a timelapse with the moon rising over Graz. The first minutes with a deep red moon were amazing 🙂

3 hour Solar prominence timelapse 2020-04-12
This prominence occured right after the sunspot region 12579 vanished and rotated out of view. The video shows the development from 09:02:25-12:15:05 UTC+2.
Video recorded with 715mm f/7 refractor with 4x telecentric system and SolarSpectrum 0.5A filter on ZWO120MM-S camera. Sequence consists of 490 images. Each image is a stack of 500 frames each. (For the complete sequence, 245.000 images have been processed)
Solar prominence timelapse
I had the chance to borrow a Hydrogen alpha filter for solar observation. As the weather was just perfect, I set up my 80/600 refractor with the filter and a camera attached. Every 15 seconds I captured 400 frames for later processing. After 4 hours, my hard disk was loaded with 850GB of data…
Now, more than 2 days of stacking, aligning, optimizing, … are over. The resulting image sequence is simply fascinating and beautiful:
A splendid night out in the countryside
Last night I spent near my home town – a short 25 minutes drive – to a place I frequently used years back for astronomy. It is a quite dark spot, though the light pollution is still obvious. Nevertheless I tried to go for some deep sky objects, getting as much observation / camera time as possible in the short nights of June.
My list of objects was not too short. All of them were well placed in the sky and really nice to see :-). So here you go:
1) Hercules cluster M13 (Sony A99ii, 800mm f4, 2xTC, 27x120s, ISO3200)
2) Virgo galaxies M60, M87, M90, M100 (Sony A6000mod, 70-200mmf2.8 @ 200mm f4.5, 22x300s, ISO3200)
3) Virgo galaxy M90 – though I intended M87 😉
4) Whirlpool galaxy M51 (Sony A99ii, 800mm f4, 2xTC, 6x360s, ISO3200)
5) Andromeda galaxy M31 (Sony A6000mod, 70-200mm f2.8 @ 200mm f4.5, 5x30s, ISO3200) – I made an error in exposure time, so instead of 5×300 I ended up with 5x30s 🙁
6) Jupiter (I did not pack my planetary imaging camera – so I used the same setup with Sony A99ii and 800mm scope at 1600mm)
7) Saturn (same as Jupiter)
And far too late (at 01:30) I set up my timelapse camera for a night-to-day movie. The milkyway was beautifully placed just above the pasture. The resulting video clip is below.


