With the sun in solar maximum 2024 had several fascinating aurora events even far from the aurora oval at around 66 degrees latitude. Therefore I planned for a trip to Iceland, to see aurora in its best. Who could expect the sun to take a pause, so no significant eruption takes place from the first days of 2025 on? Reencouraged with a note from space weather officials, that the setting of interplanetary magnetic field, earths magnetic field and the ring current was favorable to produce aurora at least close to the aurora oval, I travelled to Iceland. Arriving there in anticipation for a pristine northern winter experience had another surprise at hand: a large low pressure zone lured south of Iceland. This low pressure zone caused strong winds (reaching almost 30m/s), lots of rain and unusually high temperatures (up to 9°C) for February.
After four days of grey skies and rain, weather was improving a bit. Even a 3-4 hour window of cloudless skies was predicted for the late evening. As if planned, when the clouds subseeded, the aurora began its show. Most of the time, Aurora was like eery greyish cloud bands to the naked eye. But during phases of increased intensity, green and red tones were also clearly visible. On camera, especially the green aurora looks spectacular!
The following day was again quite wet. But at night, once again a few hours with little cloud cover provided another aurora show to be witnessed. To top off the Iceland experience, on the last day a few moments of sunlight during sunset let me part in joy to have seen aurora and the beauty of this island
Recently I visited Helsinki (Finland). Temperatures dropped down to -15°C, causing even the waters in Kruununvuorenselkä to freeze over. Further out, patches of ice foes were drifting. Along with a fresh blanket of snow, everything just looked amazing. Especially Nuuksio national park close to Helsinki provided a marvellous setting for a great time
During the last years I frequently ran into trouble with the stock Sony batteries. Neither of the camera – battery combinations I had, were capable of imaging more than approximately 4 to 5 hours (some cameras drained their batteries within less than 2 hours). So I tried to determine the optimum means of powering a Sony camera for several hours without the need to change batteries. Here is, what I came up with:
Option 1: Batteries with increased capacity Several after market companies offer compatible batteries with increased capacity. These batteries are also offered at more than competitive price tags. In my experience, most of these batteries do not provide the capacity as imprinted. There are units, which significantly exceed the stock batteries. But you may also get a battery, which is outperformed by the stock battery – even though it is offered at twice the capacity. If you are lucky and you have a well performing battery, you may extend the time in operation by 10%-50%.
Pro
Con
– economic price – up to 50% longer operation – no external units required
– does not last a whole night – capacity labelling may be misleading
Option 2: USB power supply Several – and at least the new models – have a USB port, which is capable of powering the camera during usage. This is a great way to have your camera last for hours. This is also a truly economic way, as you simply plug a USB power bank to the camera. Be aware, that you may need a special splitter cable, to simultaneously run a trigger and the USB power supply through the Multi-Port connector! See here, how such a cable may look like: Combined charger and trigger cable for Sony mirrorless cameras like A6400 But to my experience with a Sony A6400, the USB port is not capable of providing sufficient power in heavy use situations. When I had the camera shoot 3000-7000 images in 1 second intervals, I ended up with a (almost) drained battery. So the camera was constantly discharging and charging the battery. The discharge rate was higher than the charging rate. This caused the camera to significantly heat up – which is highly discouraged in astrophotography! Further more, at least the battery is set under unneccessary stress.
Pro
Con
– really cheap – may last the whole night – may be “hot plugged”
– camera may heat up – special cable may be required – battery stress
Option 3: Vertical Grip The majority of the higher end and high end cameras may be equipped with a vertical grip unit. The vertical grip units are typically fitted to the battery slot instead of the battery. To power the camera, the vertical grip incorporates a tray for 2 battereries. This doubles the capacity possible. But depending on the camera, if you keep the remote trigger port constantly in focus / pre-fire mode, the camera may not switch to the second battery. So you may end up with a camera in power-safe mode and an exhausted battery as well as a fully charged one… Further more, you have to keep in mind, that the vertical grip units are quite heavy (adding a couple 100g in weight). This may be an issue to your setup!
Pro
Con
– no external components – easy to handle
– vertical grips are not quite cheap – battery capacity only doubled – higher weight
Option 4: External power supply Some Sony cameras have a power in connector. This is a proprietary connector, which was already in use back in the Konica/Minolta aera. The connector is flat, with both poles on the opposite sides. On one side, there is a small bar, to prevent reverse plugging. So, technically, no big deal. Unfortunately the connectors are not available individually. But nowadays, you get really cheap power supplies with matching connectors online. If you are a DIY person: it is really easy to build or use such a connector; Simply provide 7.2V from a mains supply, step converter or lithium batteries ;-). To my experience, in-camera batteries are disconnected from the camera, when you plug in the external supply. So, if you plug or unplug the external supply, the camera restarts. If you leave the plug in the camera and cut the supply voltage, the camera is not operable (due to disconnected battery)
Pro
Con
– easy to handle – easy to build yourself – cheap – perfect for studio / fixed setup
– designed for mains connection – does not charge in-camera batteries – disconnects in-camera battery (no backup, if mains fails)
Option 5: Battery dummy Dummy batteries are a great sollution for long lasting scenarios. You replace the camera battery with a plastic dummy, which has a DC plug. You simply provide 7.2-8V from any means of power supply you have. This may be a mains adapter, USB power bank with step-up adapter, a 12V car socket with step-down adapter or a lithium battery pack with 2 batteries in series. There are even some dummy batteries with included USB to 7.2V converter. But they may lack the power neccessary to drive the camera (some cameras are specified with 7.2V 2A input, which is way above the typical extended USB power scheme of 5V 2.1A. As there are so many ways to provide the power needed, it is a very versatile option. But you have to be careful in selecting the right dummy. Some dummy units do not lock perfectly in the battery slot. So the dummy may fall out of the camera, or it disconnects. Some may have very stiff cables, which pose a lot of stress to the battery compartment lid (which is a true pain to replace!) Hints: – You may never want to charge the dummy battery! This may pose a high risk of damage! – provide a well stabilized, battery-like voltage for best performance – if the dummy disconnects or is not supplied, the camera is off immediately
Pro
Con
– versatile – quite cheap – may last several hours to days
– may disconnect – not every dummy is well made
Summary Depending on the situation, I choose any of these options – or even stick to replacing the batteries frequently. But my personal favorite for long lasting sessions is Option 5 in combination with a 2S 2P or 3P lithium pack (2 or 3 parallel, 2 in series). This power pack provides 7,4V straight off (no converter needed) with far more than 4 times the capacity of the stock battery. Up until now, I never ran into drained batteries, even under -10C conditions after 10 hours shooting.
Light painting is a fascinating way to communicate a message. If the background and light is right, it is only up to your imagination what you add to your photo…
Here is how to create a light painting (how I created this New Years greeting):
Find the right scene: you need sufficient space to move you need a sufficiently dark background to “write on”
Set up your camera on a tripod
use a wide-angle lens. With a tele lens you have to stand quite far away from the camera
use a timer remote or have a friend operate the camera. Otherwise you will have a workout running back and forth 😉
prepare a flashlight, which is not too strong. A red or otherwise colored flashlight creates beautiful effects! You may cover your white light with colored filter foil as well!
wear dark, non reflecting clothes! Or you will appear like a ghost beneath the text in the image
try to memorize, which message you want to write
find the right spot where you will write, so that the text is at the right location in your image (take test shots to verify!)
find the right size to write your letters. The text has to be readable and within the bounds of your scene or camera frame
determine, wheter you will write in single strokes, or multiple strokes. This depends on the intensity of your flashlight and the desired effect, how the letters should look like. Single strokes look quite clean, whereas multiple strokes create a bit fuzzy look, which is often more appealing. Though multiple strokes are more difficult to make, as you write in thin air and have no reference, where you put the previous line. Therefore keep in mind: you only move your hand when writing one letter. Move your body only when advancing to the next letter or word!
test, how long you need for the message to write. This defines the minimum exposure length!
Set the right ISO value and aperture for the desired exposure time. Test the exposure to not over-expose. If you choose a too low ISO / too high aperture, you dim the flashlight. This makes the text you write hard to read
Now for the tricky part: The text you will write has to be written mirrored! It is the camera who “wants to read” the message, not you! Memorize your message in mirrored letters, written from right to left. It helps to close your eyes and just move your hand writing the mirrored text a couple times. Don’t get too frustrated when you make errors! Depending on the letters, I need several attemts to have everything right as well 😉
Now you are all set. Get in position, switch on your flashlight. Trigger your camera and start writing!
Tips: – cover the flashlight with your hand when advancing to the next letter / word! – move brisk but fluently – direct the flashlight to the camera – make equally spaced steps between the letters or words
I love these autumn days with pristine weather. Temperatures are still pleasent. The many red, brown, yellow and some green leaves combined with blue skies create the perfect scenery for walks and hikes. This wonderful October day had just everything of the above, set in the mountain region in Salzkammergut in Austria! The following images were taken in Hallstatt as well as around Altausseersee…
I often capture time lapse image sequences and do astrophotography. In both applications, a trigger cable and a proper means of powering the camera are essential. Keep in mind, that a fully charged battery usually lasts for no more than 3 hours. At the moment, the only way to power a Sony mirrorless camera for a whole night or several hours is a dummy battery attached to a power supply (be it a mains power supply or a 7.2V battery driven sollution). With the release of the new models recently, like the A7III or A6400, the camera may also be powered through USB charger during image acquisition. (It may still be possible, that the battery drains, but far far less.)
This is really good news, as a USB power bank will provide the juice to run a whole night or even longer! But there arises one new problem: The external trigger remotes use the same USB port as it is used for charging. This is possible, as Sony has created the so called Multiport some time back for use with their video cameras. The Multiport is an extended Micro-USB port with a second row of contacts. These contacts provide access to some control as well as audio and video output.
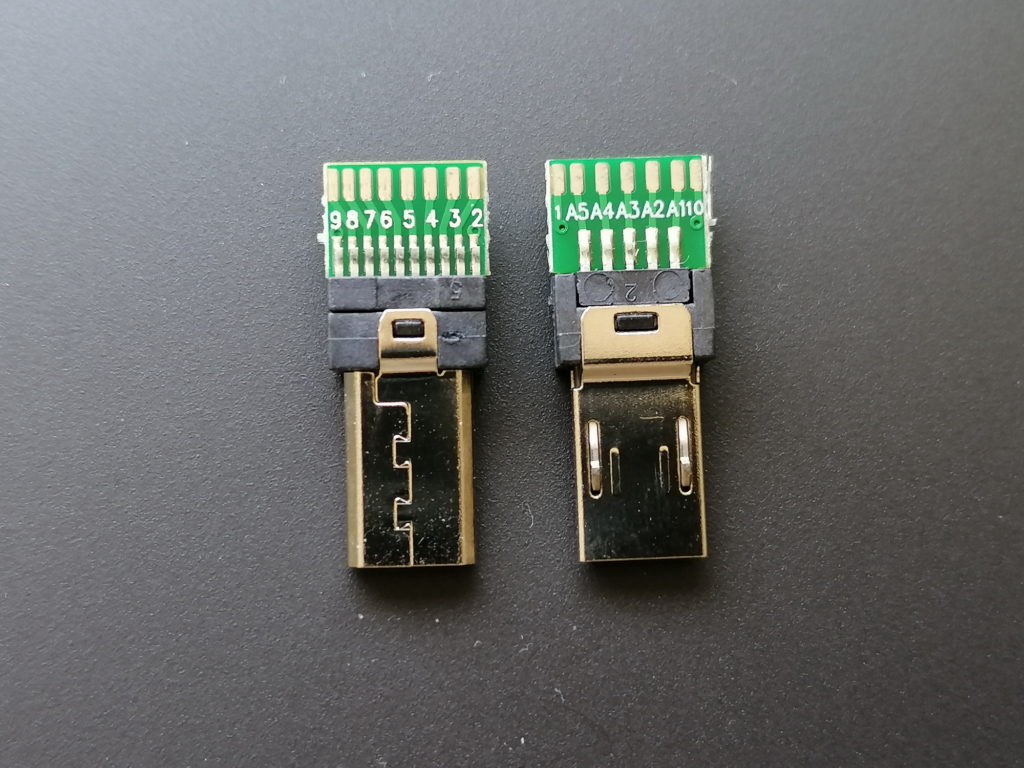
I did some research and came across Multiport connectors with solder pads for all 15 pins. See the pinout in the images at the end of the post.
Sony Multiport Adapter
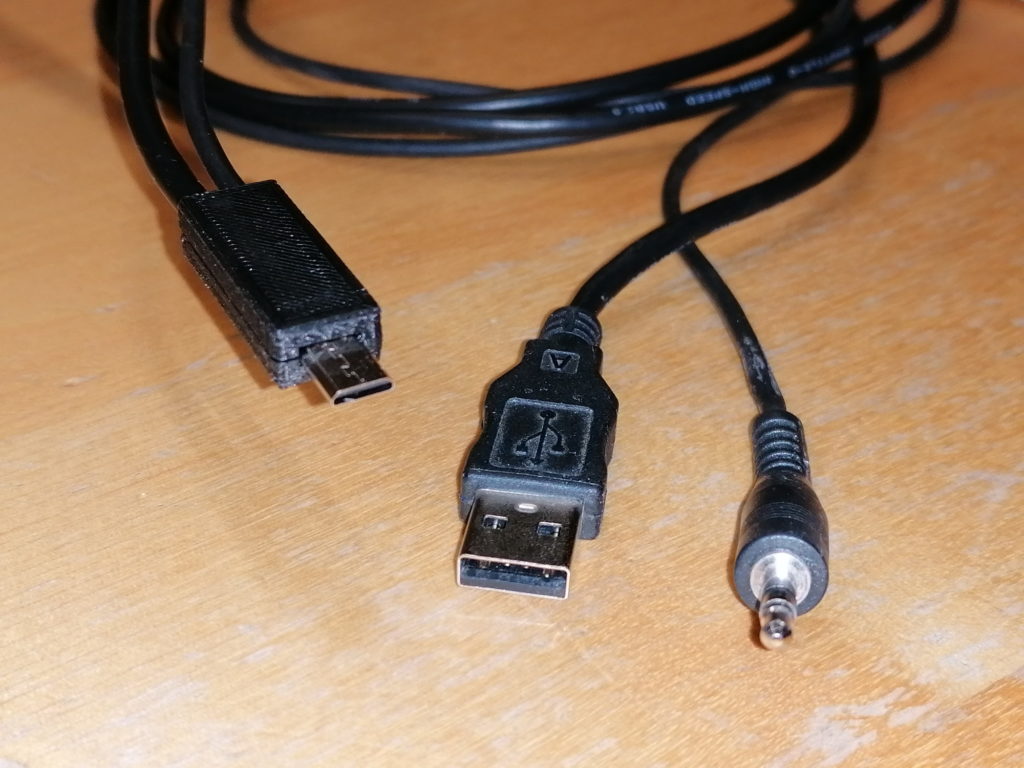
With such connectors I was able to tailor a dual cable adapter, to charge and trigger the camera at the same time! I took a USB cable with male type A connector and a headphone extender cable with male 3.5mm plug. I chose both cables around 1m in length. This should be long enough in most use cases, but not too long to reduce charging performance.
Combined charger and trigger cable for Sony mirrorless cameras
The 3.5mm plug fits some of my trigger devices. All the others have 2.5mm plugs, for which I have adapter calbes in use. Most computer timer remotes with interchangeable camera plug sold, have a 2.5mm female audio jack. See attached image for the typical pinout.
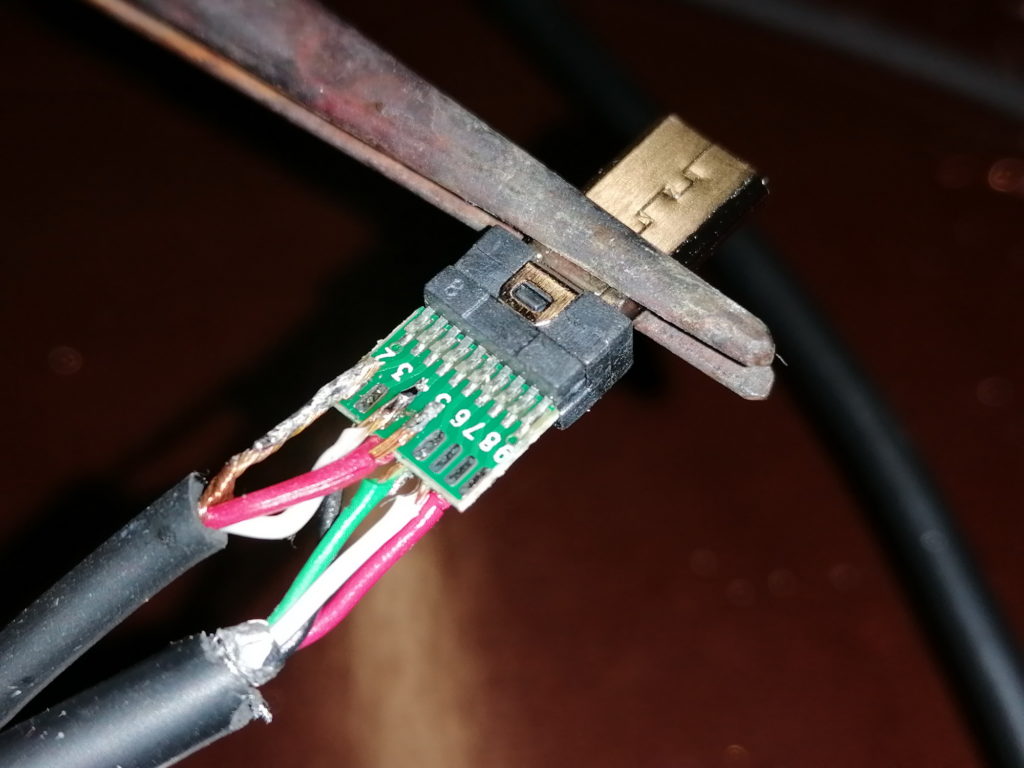
Soldering the two cables to the tiny solder pads requires a steady hand and experience in soldering. The USB as well as the audio cables have quite thin wires (AWG26 to AWG28, which equals to 0.12 mm² to 0.08 mm²), except the USB power wires (AWG22 or AWG24 in quick charge cables, which equals to 0.32 mm² and 0.20 mm²). The wires are rather stiff. Therefore, aligning the wires to the solder pads may be tricky. It gets especially tricky, if the wires are exposed from the outer isolation for less than a centimeter. Advice: Always check the finished cable for shorts and proper contact with a multimeter!
Soldered Multiport adapter with USB (bottom) and headphone (top) cables
To reduce wear, which may lead to wires breaking off the solder pads, I designed a connector housing / case. The housing holds the adapter as well as the cables in place. Furthermore, this is the only proper way to handle the connector upon pluggin to / unpluggin from the camera. The connector case is 3D printed. I share the STL file on Thingiverse here: https://www.thingiverse.com/thing:4279366
Disclaimer: This is a guide put together as reference for me. If you follow this description, you will do so on your own risk. I may not be held responsible for any damage or injury caused!
Graz is a town, having still a city center with a lot of its original medieval flair. One of the best places to watch a sunset is on top of Schlossberg. There you may find Uhrturm (the clock tower). This landmark may be seen from most parts of the town. This is how it looks like:
The Horseshoe Bend is an incredible place to see a sunset. When you arrive at the right time, a front row “seat” may still be available. Though nowadays literally crowds are streaming to the canyon rim to see the Horseshoe Bend. But be aware of the steep drop right next to you! The 300m straight down are nothing for the faint at heart. And you sure wont want to drop anything as it would just be lost forever.
Now if you are careful and ensure that spectators wont ruin your shots, you may set up the camera quite close to the edge. I took my turn and created a HDR sequence (5 photos per frame) of the sun descending behind the horizon:
This site uses cookies. By continuing to use the site (including navigation and scrolling), you agree to the use of cookies. more information
The cookie settings on this website are set to "allow cookies" to give you the best browsing experience possible. If you continue to use this website without changing your cookie settings or you click "Accept" below then you are consenting to this.