On August 12, two successive solar flares erupted from active region AR13395 within 92 minutes. The video begins at the end of the C8.8 eruption, which started at 09:04 UTC. At 2/3rds in the video, the second eruption occurs, which startet at 10:36 and lasted till 10:54.
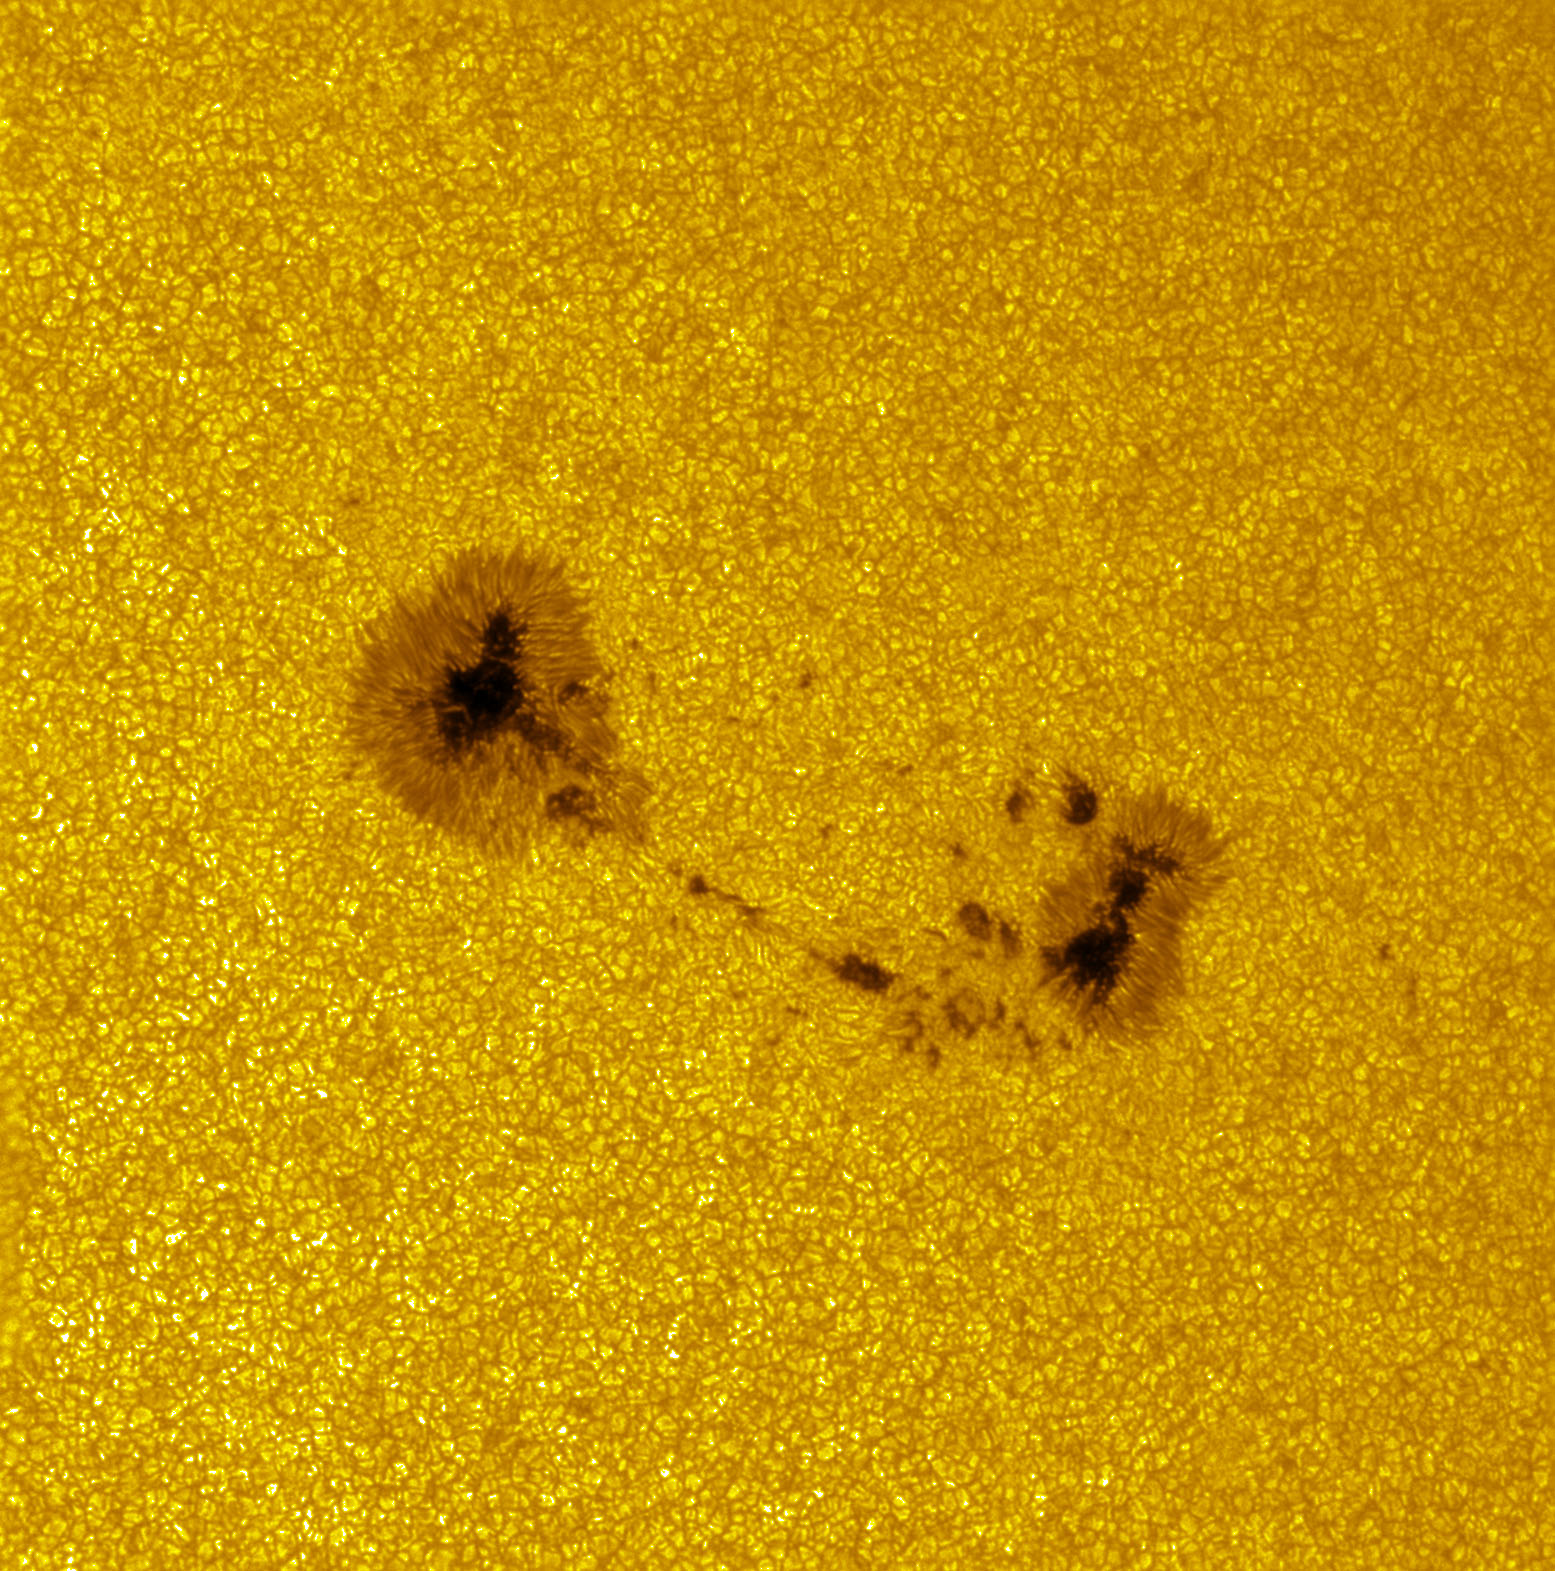
High resolution granulation around sunspot group 13403
Last week I could participate in a telescope meeting in hungary. Although it was hot and humid, the air was quite stable during the day. So I could capture a timelapse of the beautiful sunspot region 13403 with impressive resolution of 0.158 arcseconds per pixel through my 10″ Newtonian telescope. The high magnification paid off, as I could for the first time capture the fascitating motion of the granulation.
Technical details:
Telescope: 10″ f/5 Newton + 2.5x Barlow lens = 3125mm effective focal length
Camera: QHY183M (2.4µm pixels)
Filters: Baader solar film + Baader solar continuum
Sequence: 149x 1000 frames, 30s interval
Recording time: 10:26-11:42 UTC
Sunspot 12804 plus prominences and filaments
After a brief break early February, the Sun is still showing activity. Here are the nice but small sun spot 12804 as well as 2 filaments and a detatched prominence.
Image data:
Date: 2021-02-26 13:30 – 14:00 UTC
Location: Graz, Austria
Telescope: 102mm f/7 APO with 4x Tele-Centric
Camera: QHY183C @ -10C
Filters: SolarSpectrum 0.5A @ 60.5C


Sahara dust – or did we wake up on Mars?
Last night, during quite clear conditions, the majority of the stars vanished in a haze. The bright moon did the rest to let me cease imaging. The haze was not actually a haze, but rather the dust carried from the Sahara desert to central Europe.
In the morning, the rising Sun appeared rather soft and set in a diffuse sky. If there were no buildings, but red sandy flats, one could be tempted to be viewing new images from Mars 😉

Some activity on the sun (Prominence, Filament, Sun Spot)
After 2 weeks, the sun has some beautiful activity to observe. Apart from a quite small sun-spot, there is nice prominence activity as well as a filament.
Image data:
Date: 2021-02-20 12:30 – 14:10 UTC
Location: Graz, Austria
Telescope: 102mm f/7 APO with 4x Tele-Centric
Camera: QHY183C @ -30C
Filters: SolarSpectrum 0.5A @ 60.5C


Effect of temperature tuning a Fabry-Perot Etalon solar H-alpha filter
Since the first days I could observe the sun through a narrow band solar H-alpha filter, I was wondering what the tuning effect of such a filter would be. It does not matter whether the filter is pressure, tilt or temperature tuned. The effect of slightly shifting the filter central line is the same. With the temperature tuned filter, I have at hands, a comparable test series is easy to achieve.
I know from previous observations that the filter performs best at 58.0C. Therefore I set the test points at 5 degrees steps across the range of possible temperatures. Only close to the 58C I added 2.5C halve interval steps.
Each individual image was recorded with a set of 100 frames, from which the 20 best frames were stacked. At each temperature I recorded 2 sets at different exposure settings: one for the surface (granulation, … – unfortunately no sunspots were active) and the other for prominences (only minor activity here as well).
As is obvious from the result, the low temperature settings yield close to no interesting view. Between 55.5C and 63.0C the filter delivers good contrast. Beginning at 63.0C contrast degrades again.
Imaging setup:
Telescope: 102mm refractor
Camera: QHY183M @ -20C
Filter: Solar Spectrum – Solar Observer Series 1.5, 0.5A solar H-alpha filter

Sunspots 12785, 12786, 12787 and 12788 plus prominences from 2020-11-30
Again a series of images of the currently active regions of the sun. All images taken in the mid-morning of 2020-11-30.
Unfortunately, these will be the last images for several days, as a persistent cloud system arrived that day…


Sunspots 12785, 12786, 12788 from 2020-11-29
The prolongued quiet phase of the transition from solar cycle 24 to 25 hasn’t have much to show off. But now, the sun has several sunspots as well as prominences to marvel on!
It is really fascinating, that the sun burst into activity within only a few days.
I was lucky to get a brief period of cloud free late morning to image the sunspots 12785 (the spot to the right), 12786 (the large whale-shaped spot to the right, including the tiny spots left to it) and 12788 (the group of tiny spots to the south-east of 12786) in a 2-tile mosaic.
On the limb, there is quite some activity too! See the 2 parts with prominences here:


Prominence timelapse from 2020-11-22
On November 22 on the south-eastern limb of the sun, a stable prominence was visible. The prominence seems to consist of three different prominences (one flame type, one fan type and one arch type). They all seem to origin from sunspots 12785 and 12786. Whereas I assume, that the arch type prominence to the right is most likely from 12786.
The timelapse shows the activity of the prominences from 09:45-12:30 UTC. The clip has 342 individual images. Each image was stacked from 12 frames out of bursts of 300 frames. Post processing and colorization in PixInsight.
These 2 images from beginning and end of sequence show the beautiful structur as well as the changes within.


150 Megapixel mosaic of the sun
My solar imaging setup has a quite high magnification. Even though I use a 20 Megapixel QHY183 camera, I may only frame less than a third of the disk diameter at once. This is really neat for prominences and sunspots. But I may not record the whole solar disk. Therefore my only way to go is a panorama or mosaic.
The tricky part of recording a mosaic of the sun is, that you don’t have too much time to complete. First, the sun rotates (even the 25 days period may cause defects at high resolution imaging). Second, some features like granulation or prominences may change within minutes.
For high quality results, the lucky imaging approach has to be used. Meaning, each individual recording for a tile should consist of as many images (lets call them frames, as the data is recorded as a video) as possible. In post processing, only the best frames will be selected and combined for low noise results.
Last weekend I ran the first real test for a giant mosaic image of the sun in H-alpha. I recorded each individual tile with SharpCap. I had to use the seeing filter due to a rather slow USB connected drive. Each tile consists of a set of only 100 out of 2000. From these 100 selected images, only 4 were used to create the final image tiles (which proofed to be a wrong decision, as noise levels remained quite high).
To record the complete surface, I needed to capture 12 tiles. So I ended up using 48 individual frames out of 24.000. After crunching through the 30+GB of data recorded on disk (which was only 5% of the images captured) for several hours, I finally have a stunning picture of the sun in high resolution 🙂
Processing steps:
1) Stacking in AutoStakkert!3
2) Stitching in Photoshop (manually, as neither Photoshop, nor Hugin were able to align the tiles)
3) Gradient removal in Photoshop
4) Wavelet sharpening in PixInsight
5) Histogram optimization in PixInsight
6) Cleaning of edges and border of image in Photoshop
7) Colorization in Photoshop

If you want to fully enjoy this image, here is the 7500×7500 pixel version.