Even though the dark night in June is quite short, I could capture these images of Makarian Chain around M86 in Virgo and the Iris Nebula. Images captured near Sommeralm, 30km north-east of Graz. Night sky still suffers from light pollution. The milky way was visible, but not crisp and clear.
This eveneing I tested the capabilities of live-stacking in SharpCap and compared the results to a set of longer exposures. The results of the extremely short live-stacking are stunning! Live-Stacking: 19×2.7s = 51s Normal stacking: 25x30s = 750s
Imaging with narrow band H-alpha filters for solar imaging (prominences and chromosphere) requires the light beam to be almost parallel before entering the special interference filter called Etalon filter. This is achieved by i.e. telecentric systems, also extending the focal length by a factor of 2-4x. The sensor protection glass and anti-reflection glass of the camera create reflections with each other and the filter surface. Due to the parallel light beam, these reflections create interference patterns, noticable as so called Newton’s rings in the image. It depends on several different factors like sensor construction (micro lenses, …), exact angle of sensor in optical path, angle between sensor and filter / protection glass, … how strong the Newton’s rings influence the resulting images.
It is possible to reduce or eliminate this in post processing. But any minor shift in the imaging train will make it almost impossible to compensate with flat-field images. Fortunately, there is one alternative option: tilting the camera by a few degrees (usually up to 5 degrees), to widen the distance of the Newton’s rings, where they are no longer disturbing.
As these tilt adapters have a quite steep price tag, I constructed and printed one myself. I had to create several versions, until I had achieved a proper stability as well as stray light protection. But finally, I have a working tool 🙂 If you are interested in the design, you find the 3D files and description here: https://www.thingiverse.com/thing:4301757
See how much the tilt changes the resulting image! Hints to the images: – The blurry look in the image with Newton’s rings results from the alignment algorithm locking on the Newton’s rings instead of surface features – the adapter attached to the filter is a prototype without stray light protection. Hence a strip of black insulation tape was used for shade
This prominence occured right after the sunspot region 12579 vanished and rotated out of view. The video shows the development from 09:02:25-12:15:05 UTC+2. Video recorded with 715mm f/7 refractor with 4x telecentric system and SolarSpectrum 0.5A filter on ZWO120MM-S camera. Sequence consists of 490 images. Each image is a stack of 500 frames each. (For the complete sequence, 245.000 images have been processed)
I often capture time lapse image sequences and do astrophotography. In both applications, a trigger cable and a proper means of powering the camera are essential. Keep in mind, that a fully charged battery usually lasts for no more than 3 hours. At the moment, the only way to power a Sony mirrorless camera for a whole night or several hours is a dummy battery attached to a power supply (be it a mains power supply or a 7.2V battery driven sollution). With the release of the new models recently, like the A7III or A6400, the camera may also be powered through USB charger during image acquisition. (It may still be possible, that the battery drains, but far far less.)
This is really good news, as a USB power bank will provide the juice to run a whole night or even longer! But there arises one new problem: The external trigger remotes use the same USB port as it is used for charging. This is possible, as Sony has created the so called Multiport some time back for use with their video cameras. The Multiport is an extended Micro-USB port with a second row of contacts. These contacts provide access to some control as well as audio and video output.
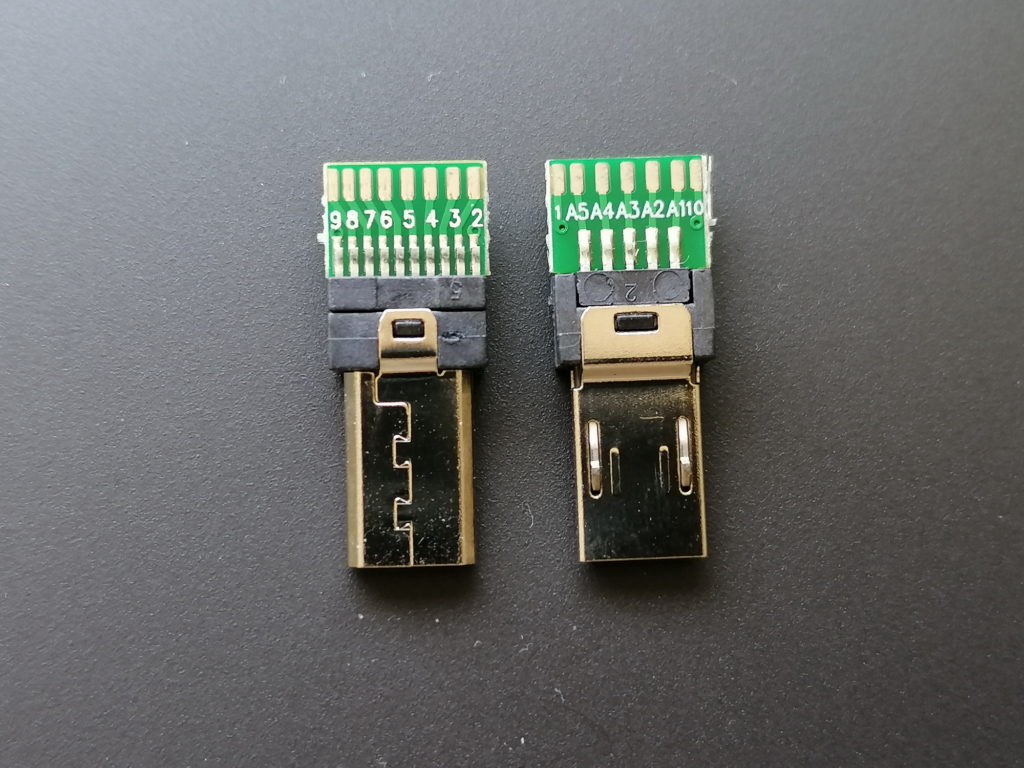
I did some research and came across Multiport connectors with solder pads for all 15 pins. See the pinout in the images at the end of the post.
Sony Multiport Adapter
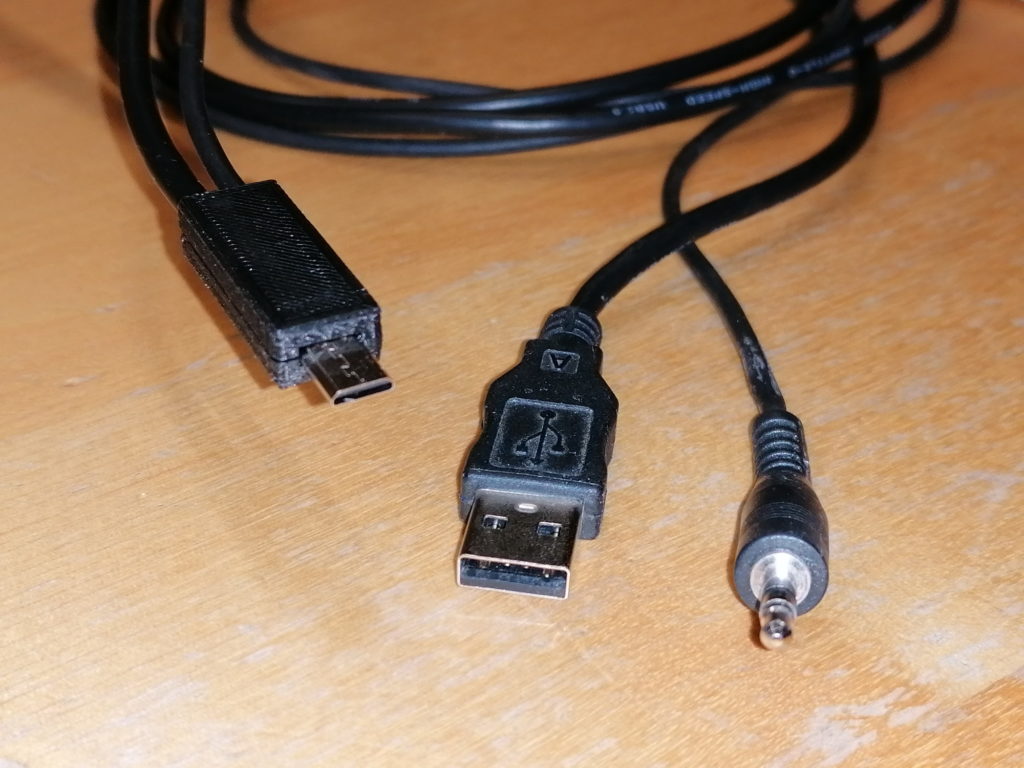
With such connectors I was able to tailor a dual cable adapter, to charge and trigger the camera at the same time! I took a USB cable with male type A connector and a headphone extender cable with male 3.5mm plug. I chose both cables around 1m in length. This should be long enough in most use cases, but not too long to reduce charging performance.
Combined charger and trigger cable for Sony mirrorless cameras
The 3.5mm plug fits some of my trigger devices. All the others have 2.5mm plugs, for which I have adapter calbes in use. Most computer timer remotes with interchangeable camera plug sold, have a 2.5mm female audio jack. See attached image for the typical pinout.
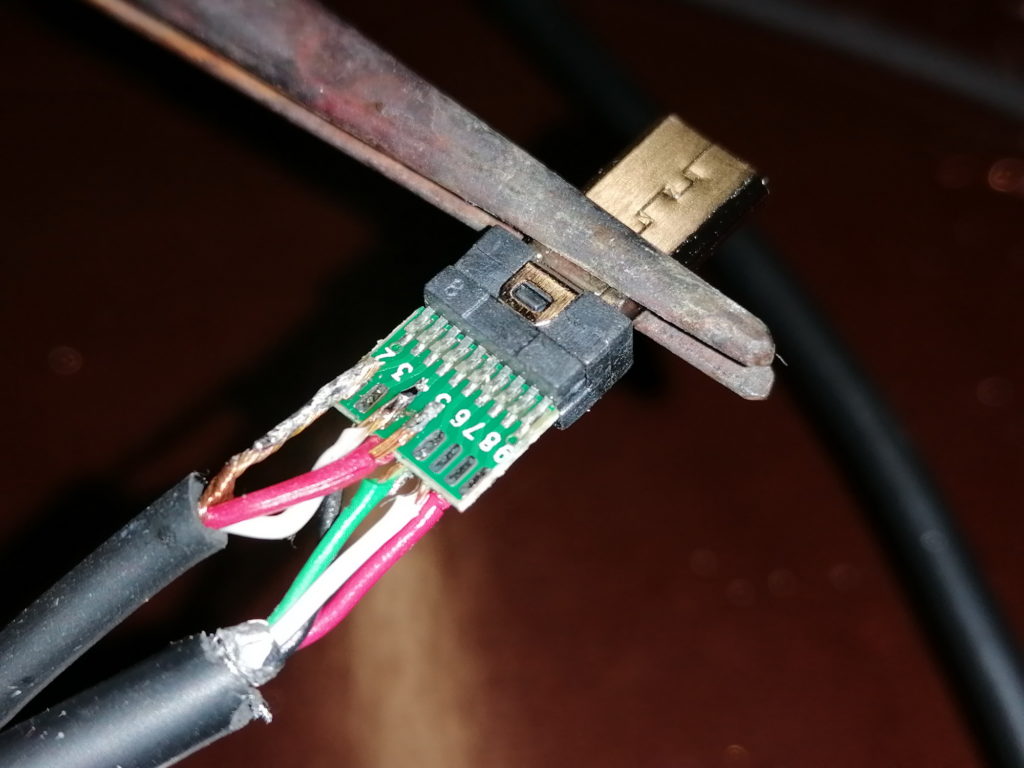
Soldering the two cables to the tiny solder pads requires a steady hand and experience in soldering. The USB as well as the audio cables have quite thin wires (AWG26 to AWG28, which equals to 0.12 mm² to 0.08 mm²), except the USB power wires (AWG22 or AWG24 in quick charge cables, which equals to 0.32 mm² and 0.20 mm²). The wires are rather stiff. Therefore, aligning the wires to the solder pads may be tricky. It gets especially tricky, if the wires are exposed from the outer isolation for less than a centimeter. Advice: Always check the finished cable for shorts and proper contact with a multimeter!
Soldered Multiport adapter with USB (bottom) and headphone (top) cables
To reduce wear, which may lead to wires breaking off the solder pads, I designed a connector housing / case. The housing holds the adapter as well as the cables in place. Furthermore, this is the only proper way to handle the connector upon pluggin to / unpluggin from the camera. The connector case is 3D printed. I share the STL file on Thingiverse here: https://www.thingiverse.com/thing:4279366
Disclaimer: This is a guide put together as reference for me. If you follow this description, you will do so on your own risk. I may not be held responsible for any damage or injury caused!
I had the chance to borrow a Hydrogen alpha filter for solar observation. As the weather was just perfect, I set up my 80/600 refractor with the filter and a camera attached. Every 15 seconds I captured 400 frames for later processing. After 4 hours, my hard disk was loaded with 850GB of data…
Now, more than 2 days of stacking, aligning, optimizing, … are over. The resulting image sequence is simply fascinating and beautiful:
As the nights are really short right now, I set up my scope at home and took a look at the moon. Seeing was not too good, but in moderate magnification, the moon still was pleasant to look at. So I thought, I did not shoot the Moon or the planets for a while. Why not give it a shot? I took my my planetary camera which was stored in their box for more than 2 years and set up for imaging…
For the “first” results, I am really pleased. Now I think I have to optimize and go for it again soon 🙂
Image properties:
102mm f7 APO, ASI120MM-S, RGB+IR Filters
Copernicus: 10% of approximately 5000 frames
Plato: 10% of approximately 11000 frames
Last night I spent near my home town – a short 25 minutes drive – to a place I frequently used years back for astronomy. It is a quite dark spot, though the light pollution is still obvious. Nevertheless I tried to go for some deep sky objects, getting as much observation / camera time as possible in the short nights of June.
My list of objects was not too short. All of them were well placed in the sky and really nice to see :-). So here you go: 1) Hercules cluster M13 (Sony A99ii, 800mm f4, 2xTC, 27x120s, ISO3200) 2) Virgo galaxies M60, M87, M90, M100 (Sony A6000mod, 70-200mmf2.8 @ 200mm f4.5, 22x300s, ISO3200) 3) Virgo galaxy M90 – though I intended M87 😉 4) Whirlpool galaxy M51 (Sony A99ii, 800mm f4, 2xTC, 6x360s, ISO3200) 5) Andromeda galaxy M31 (Sony A6000mod, 70-200mm f2.8 @ 200mm f4.5, 5x30s, ISO3200) – I made an error in exposure time, so instead of 5×300 I ended up with 5x30s 🙁 6) Jupiter (I did not pack my planetary imaging camera – so I used the same setup with Sony A99ii and 800mm scope at 1600mm) 7) Saturn (same as Jupiter)
And far too late (at 01:30) I set up my timelapse camera for a night-to-day movie. The milkyway was beautifully placed just above the pasture. The resulting video clip is below.
Finally a couple of cloud free evenings are here! So lets see, what is to see from the city…
From a balcony facing south across a city, there usually is not too much to expect. This time, I chose the star cluster M5, which is quite bright an was not too hard to see in the scope. Sure, it does not hold to a darker spot away from light polluted city skies. But hey, there is still a lot to see:
Image properties: 75x 40s, 800mm f/4, Sony A99ii @ ISO 1600
After the completely washed away telescope meeting in the beginning of May, I tried to meet up with a few enthusiasts with quite promising weather prospects. Unfortunately the cloud cover did not vanish all the way. Even though there was quite a lot of clouds passing over, I could manage to snap some light frames from M51 – the Whirlpool Galaxy.
It was fun chatting and also delicious being hosted with creole food 🙂 which compensates for almost any cloudy night!
This site uses cookies. By continuing to use the site (including navigation and scrolling), you agree to the use of cookies. more information
The cookie settings on this website are set to "allow cookies" to give you the best browsing experience possible. If you continue to use this website without changing your cookie settings or you click "Accept" below then you are consenting to this.