Battery replacement of Panasonic hair trimmer, Models ER1410 and similar with standard AA NiMH batteries

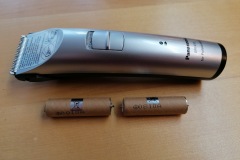
I own a Panasonic ER1410 hair trimmer. Unfortunately, after a few years of service, the batteries did no longer charge. I continued to use it in wired mode. But it is by far no comfort to have the cable dangling around. So after some time I decided to check for a battery replacement.
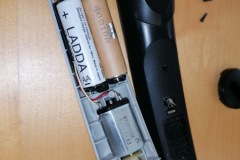
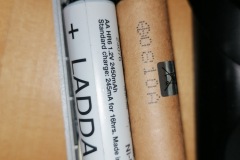
There are several offers for a set of replacement batteries available online. But these are quite expensive. Luckily the batteries are NiMH rechargable ones in AA / Mignon size. The only difference from the standard AA batteries is a pin like connector on both poles, which slide in a metal groove for contact. The design is replacement-friendly, as the batteries are not soldered to the PCB. Instead, there is a 2 slot battery carrier, designed for the pin like connectors.
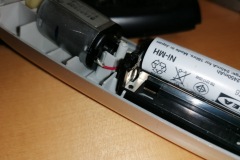
When a standard AA rechargable battery is inserted to the battery carrier, the battery has not quite good contact. To fix this, use a set of pliers to bend the metal contacts a bit. The batteries will have sufficient contact and the hair trimmer will work well!

Here are the steps I had to follow:
1. remove trimmer cartrige
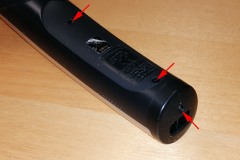
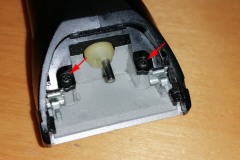
2. unscrew all 5 screws (see photo for positions)
3. remove black round part at charger connector
4. lift black bottom part
5. remove batteries and remember polarities!
6. bend metal contacts inwards with pliers until new batteries have firm contact
7. insert new 1.2V NiMH AA batteries (check polarity!)
8. close trimmer and fasten all 5 screws
9. test operation and charging

Disclaimer:
This is a guide put together as reference for me. If you follow this description, you will do so on your own risk. I will not be held responsible for any damage or injury caused by a DIY repair. Be aware, that using wrong batteries (i.e. non-rechargable, wrong type / Voltage, …) or batteries installed wrong may cause serious injuries and carry a high risk of fire!

Constructing a clean chamber for camera and lens repairs

When I started to modify second hand camera lenses, I soon found it rather difficult to keep dust away. Especially when I had to disassemble the lens for stuck aperture or compact cameras, I struggled to reassemble without dust on the lenses.
Some time later, I bought a Sony Alpha 6000 camera to modify for full spectrum (see seperate post). This triggered me to research for and build a clean room chamber…

A clean chamber may be constructed in several ways. The most compact and easiest way would be a transparent plastic container with attached rubber gloves. This would be OK for some tasks, but not for a mechanical repair or modification due to the huge amount of parts and tools to work with.
So I decided to go for a biomedical laboratory style system, which uses excess pressure ventilation with clean air. You can think of this as a larger box with a slit on the base of one side, where you operate. A ventilation system creates – preferably a laminar – air flow from the top, which exits through the slit. Before work begins, ventilation is turned on and all surfaces within the chamber are cleaned twice with a couple of minutes setting time inbetween, to remove as much dust as possible. When you move your hands or operate any objects within the chamber, do it slow! Clean all objects, tools and your hands before entering the chamber. The continuous air flow will now prevent dust from entering the chamber and you are good to go.

Construction:
I used 4 sheets of decorative chipboard and a sheet of acrylic glass to contruct the chamber. All board were simply screwed together. In the top board I cut holes for the ventilation. Further more I installed 2 LED lights.
The ventilation is constructed of 3 seperate units. Each unit has a high volume 12V propeller attached to a flat duct system. The adapter for the propeller was CAD designed and 3D printet (available here). In each of the flat duct systems I installed 3 HEPA filters as outlets. So in the complete setup, there are 3 fans with 130cfm (220 m3/h) each (feeding through 9 HEPA filters) and 2 LED

lights. All components are powered by 12V, which makes the electrical setup safe and easy.
Hint on the HEPA filters: I bought the small filter cartridges for vaccuum cleaner robots, on ebay for a dollar each.

Parts used:
2x 40x60cm decorative chipboard (19mm thick)
1x 60x80cm decorative chipboard (19mm thick)
1x 40x80cm decorative chipboard or MDF board (6mm thick)
1x 40x80cm acrylic glass, 5mm thick
3x 120x120mm fan, 130cfm
3x 70cm flat duct 60x100mm
3x 3d printed fan adapter
6x End-caps for flat duct (or plastic sheets to fit)
9x HEPA filters cartridges
2x 3W GU10.3 LED lamp
2x GU10.3 mounts
1x 12V 5A power supply
several screws
mounting adhesive

Total cost was approximately 60 EUR

This site uses cookies. By continuing to use the site (including navigation and scrolling), you agree to the use of cookies. more information

The cookie settings on this website are set to "allow cookies" to give you the best browsing experience possible. If you continue to use this website without changing your cookie settings or you click "Accept" below then you are consenting to this.

Close